


The National Institute of Certified Floor-Covering Inspectors (NICFI) is a
non-profit association of independent floor covering inspectors. NICFI members are expert flooring failure analysts and expert witnesses in flooring problems and failures.
NICFI members are experienced in the inspection and failure analysis of
woven carpet, broadloom carpet, resilient tile, rubber tile, cork tile, ceramic tile, resilient sheet vinyl, vinyl composition tile, LVT, hardwood, laminate, solid vinyl,
and specialty flooring materials.
NICFI members attend the annual NICFI Convention in Dalton, Georgia, to increase their knowledge and update their skills. The Annual Convention includes updates on indicative field testing
procedures, tools, products and product defects. The NICFI is the only Non-Profit Association in the Flooring Industry with membership comprised solely of Certified Floor Covering Inspectors.


PHOTOS
IS THIS YOUR COMPLAINT?


CONTENTS BELOW
- CUSTOM WOOD DESIGNED FLOORS VIDEO
- EMC
- JANKA RATINGS
- WOOD FLOORS IN KITCHENS
- ACRYLIC IMPREGNATED WOOD Co. Specifications & site address link
- PENDING
- ACCLIMATION information
- PATINA
- WOOD FLOOR GLOSSARY
- OAK
- FLOOR SHRINKAGE & EXPANSION
- CHECKING
- TRY TO AVOID CHECKING
- OLD FLOORS
- POWDER POST BEETLES
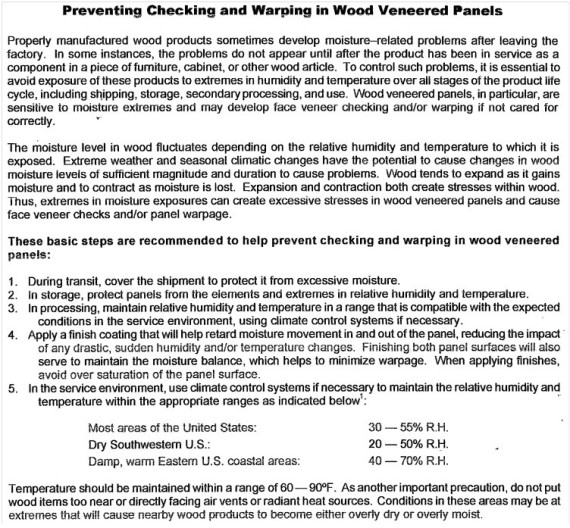
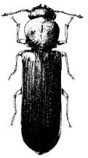
- TYPES OF CUTS OFF LOGS
- DETERMINING RELATIVE HUMIDITY
- NATURAL WOOD STRAND
- WOOD ENGRAVING
- COUNTERSINK SCREWS
- WIDTH MEASUREMENTS OF SOLID PREFINISHED
- DEAD SPOTS
- MINERAL STAINS
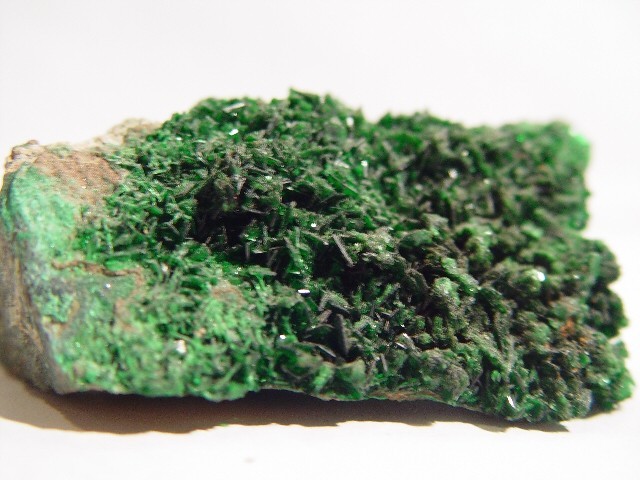
- EMERALD BORER
- ADHESIVES - NEED TO KNOW
- SUBFLOOR REQUIREMENTS
- ASTHMA
- SILICA STREAKS
- WHY KILN DRYING DOESN’T “FIX” WOOD MOISTURE CONTENT
NOTE: ANY PART OF THE GENERAL INFORMATION FOUND BELOW SHOULD NOT ASSUME TO BE OF ANY SOLE CAUSE OF FAILURE. PARTICULAR FAILURES SHOULD HAVE A COMPLETE & PROFESSIONAL EVALUATION.
ANY QUESTIONS EMAIL to floorcovering@cox.net
1. DESIGN SAMPLES VIDEO
HARDWOOD FLOORING
HARDWOOD PLANK MANUFACTURING
2. EMC
EQUILIBRIUM MOISTURE CONTENT
Wood is a hydroscopic. It has the ability to take in or give off moisture in the form of vapour. Water contained in wood exerts vapour pressure of its own, which is determined by the maximum size of the capillaries filled with water at any time. If water vapour pressure in the ambient space is lower than vapour pressure within wood, desorption takes place. The largest-sized capillaries, which are full of water at the time, empty first. Vapour pressure within the wood falls as water is successively contained in smaller capillaries. A stage is eventually reached when vapour pressure within the wood equals vapour pressure in the ambient space above the wood, and further desorption ceases. The amount of moisture that remains in the wood at this stage is in equilibrium with water vapour pressure in the ambient space, and is termed the equilibrium moisture content or EMC (Siau, 1984). Because of its hygroscopicity, wood tends to reach a moisture content that is in equilibrium with the relative humidity and temperature of the surrounding air. The EMC of wood varies with the ambient relative humidity (a function of temperature) significantly, to a lesser degree with the temperature. Siau (1984) reported that the EMC also varies very slightly with species, mechanical stress, drying history of wood, density, extractives content and the direction of sorption in which the moisture change takes place (i.e. adsorption or desorption).
WOOD CONTAINS WATER IN TWO FORMS:
- Free water: The bulk of water contained in the cell lumina is only held by capillary forces. It is not bound chemically and is called free water. Free water is not in the same thermodynamic state as liquid water: energy is required to overcome the capillary forces. Furthermore, free water may contain chemicals, altering the drying characteristics of wood.
- Bound or hygroscopic water: Bound water is bound to the wood via hydrogen bonds. The attraction of wood for water arises from the presence of free hydroxyl (OH) groups in the cellulose, hemicelluloses and lignin molecules in the cell wall. The hydroxyl groups are negatively charged electrically. Water is a polar liquid. The free hydroxyl groups in cellulose attract and hold water by hydrogen bonding.
- Vapor: Water in cell lumina in the form of water vapour is normally negligible at normal temperature and humidity.
MOISTURE CONTENT OF WOOD IN SERVICE
Wood retains its hygroscopic characteristics after it is put into use. It is then subjected to fluctuating humidity, the dominant factor in determining its EMC. These fluctuations may be more or less cyclical, such as diurnal changes or annual seasonal changes. To minimize the changes in wood moisture content or the movement of wooden objects in service, wood is usually dried to a moisture content that is close to the average EMC conditions to which it will be exposed. These conditions vary for interior uses compared with exterior uses in a given geographic location. For example, according to the Australian Standard for Timber Drying Quality (AS/NZS 4787, 2001), the EMC is recommended to be 10% - 12% for the majority of Australian states, although extreme cases are up to 15 to 18% for some places in Queensland, Northern Territory, Western Australia and Tasmania. However, the EMC is as low as 6 to 7% in dry centrally heated houses and offices or in permanently air-conditioned buildings.
The primary reason for drying wood to a moisture content equivalent to its mean EMC under use conditions is to minimize the dimensional changes (or movement) in the final product.
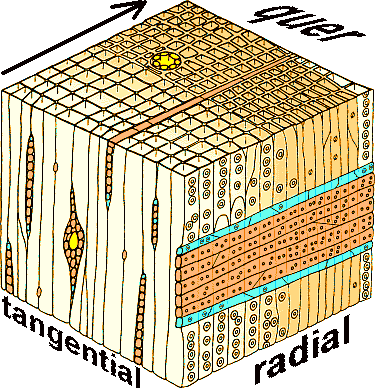
SHRINKAGE AND SWELLING may occur in wood when the moisture content is changed (Stamm, 1964). Shrinkage occurs as moisture content decreases, while swelling takes place when it increases. Volume change is not equal in all directions. The greatest dimensional change occurs in a direction tangential to the growth rings. Shrinkage from the pith outwards, or radially, is usually considerably less than tangential shrinkage, while longitudinal (along the grain) shrinkage is so slight as to be usually neglected. The longitudinal shrinkage is 0.1% to 0.3%, in contrast to transverse shrinkages, which is 2% to 10%. Tangential shrinkage is often about twice as great as in the radial direction, although in some species it is as much as five times as great. The shrinkage is about 5% to 10% in the tangential direction and about 2% to 6% in the radial direction (Walker et al., 1993).
Differential transverse shrinkage of wood is related to:
- the alternation of late wood and early wood increments within the annual ring;
- the influence of wood rays on the radial direction (Kollmann and Cote, 1968);
- the features of the cell wall structure such as microfibril angle modifications and pits;
- the chemical composition of the middle lamella.
INFLUENCE OF TEMPERATURE, RELATIVE HUMIDITY AND RATE OF AIR CIRCULATION
The external drying conditions (temperature, relative humidity and air velocity) control the external boundary conditions for drying, and hence the drying rate, as well as affecting the rate of internal moisture movement. The drying rate is affected by external drying conditions (Walker et al., 1993; Keey et al., 2000), as will now be described.
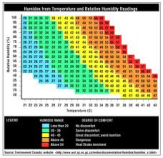
Temperature: If the relative humidity is kept constant, the higher the temperature, the higher the drying rate. Temperature influences the drying rate by increasing the moisture holding capacity of the air, as well as by accelerating the diffusion rate of moisture through the wood. The actual temperature in a drying kiln is the dry-bulb temperature (usually denoted by Tg), which is the temperature of a vapour-gas mixture determined by inserting a thermometer with a dry bulb. On the other hand, the wet-bulb temperature (TW) is defined as the temperature reached by a small amount of liquid evaporating in a large amount of an unsaturated air-vapour mixture. The temperature sensing element of this thermometer is kept moist with a porous fabric sleeve (cloth) usually put in a reservoir of clean water. A minimum air flow of 2 m/s is needed to prevent a zone of stagnant damp air formation around the sleeve (Walker et al., 1993). Since air passes over the wet sleeve, water is evaporated and cools the wet-bulb thermometer. The difference between the dry-bulb and wet-bulb temperatures, the wet-bulb depression, is used to determine the relative humidity from a standard hygrometric chart (Walker et al., 1993). A higher difference between the dry-bulb and wet-bulb temperatures indicates a lower relative humidity. For example, if the dry-bulb temperature is 100 °C and wet-bulb temperature 60 °C, then the relative humidity is read as 17% from a hygrometric chart.
Relative humidity: The relative humidity of air is defined as the partial pressure of water vapour divided by the saturated vapour pressure at the same temperature and total pressure (Siau, 1984). If the temperature is kept constant, lower relative humidities result in higher drying rates due to the increased moisture gradient in wood, resulting from the reduction of the moisture content in the surface layers when the relative humidity of air is reduced. The relative humidity is usually expressed on a percentage basis. For drying, the other essential parameter related to relative humidity is the absolute humidity, which is the mass of water vapour per unit mass of dry air (kg of water per kg of dry air). The following equation can be used to calculate the absolute humidity from the relative humidity (Strumillo and Kudra, 1986):
Air circulation rate: Drying time and timber quality depend on the air velocity and its uniform circulation. At a constant temperature and relative humidity, the highest possible drying rate is obtained by rapid circulation of air across the surface of wood, giving rapid removal of moisture evaporating from the wood. However, a higher drying rate is not always desirable, particularly for impermeable hardwoods, because higher drying rates develop greater stresses that may cause the timber to crack or distort. At very low fan speeds, less than 1 m s-1, the air flow through the stack is often laminar flow, and the heat transfer between the timber surface and the moving air stream is not particularly effective (Walker et al., 1993). The low effectiveness (externally) of heat transfer is not necessarily a problem if internal moisture movement is the key limitation to the movement of moisture, as it is for most hardwoods (Pordage and Langrish, 1999).
NOTE: Effectively evaluating EMC includes identifying several other factors.
Contact F.C.I.S-CA for complete analysis.
3. JANKA RATING
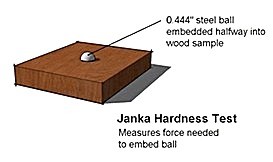
NOTE: JANKA ratings may or may not be relative to a complaint. Contact F.C.I.S-CA for complete analysis. |
|||||||||||||||||||||||||||||||||||||||||||||||||||||||||||||||||||||||||||||||||||||||||||||||||||||||||||
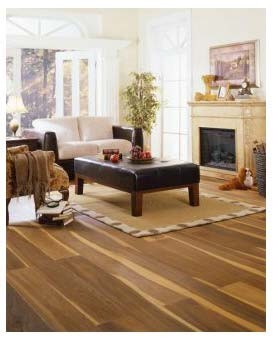
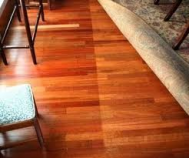
4. WOOD FLOORS FOR KITCHEN

When it comes to remodeling a kitchen the superlative thing to alter is the floor. It is difficult to decorate this specific room because you do not have enough wall space. That means you will want to use the type of flooring that will help to express the personality of your house and the room.One of the most durable types of kitchen flooring that you can apply in your kitchen are hardwood floors. Hardwood floors are constructed from several types of trees that are strong and will live for several years. They are great in any type of home and have many vantages that will appeal to anyone.If you have a family with several kids than you want to make sure you select a kitchen floor type that will be simple to maintain and will last for many years. Hardwood kitchen flooring when you take care of it properly can last betwixt 20 to 100 years. You can use particular wood cleaner that will keep it smooth and clean. If you ever get bored of the hardwood floors or discover that the wood is attenuation than you can simply fix this problem by refinishing or staining them. You can make the lighter wood darker and put on a finish that will serve to protect them. Repairing them is also simple. All you have to do is trim the portion of the wood that has problems and substitute it with a brand new plank of wood.The sterling(a) advantages to using hardwood kitchen floor is the value it will bring to your house. Many individuals establish laminate kitchen flooring that looks similar to hardwood floors but many people can separate the difference and do non appreciate the value of them like they do with hardwood floors.
NOTE: The right type wood floor for kitchens can be forever appreciated.
ContactF.C.I.S-CA for complete analysis.
5. ACRYLIC IMPREGNATED COMMERCIAL WOOD FLOORING
http://www.nydreeflooring.com/
Section 09 64 29
NYDREE FLOORING, LLC - Laminated Wood Flooring Specification
NOTE TO EDITING ARCHITECT: THIS SECTION IS A PROPRIETARY SPECIFICATION BASED ON PRODUCTS MANUFACTURED BY: 1191 Venture Drive • P.O. Box 289, Forest, Virginia 24551-0289 USA, Phone: 800.682.5698, Fax 434.525.7437 E-Mail: customerservice@nydree.com, Web: www.nydreeflooring.com
1.1 SECTION INCLUDES
Nydree Acrylic Impregnated Engineered Hardwood Flooring with PedestrianTM aluminum oxide urethane finish.
Maintenance materials.
Acrylic Impregnated accessories including: Flush Stair Nosing, Stair Tread, Stair Riser, T-Molding, Type A Reducer Strip, Type B Reducer Strip and Type C Flat Strip. Non-impregnated accessories including: 3” & 4” Base Molding and ¾” Quarter Round. Note: Accessories are not available for COR.
1.2 RELATED SECTIONS
Section: 03 10 00 - Concrete Forming
Section: 03 30 00 - Cast-in-place Concrete
Section: 06 10 00 - Rough Carpentry
1.3 REFERENCES
A. ASTM E648 - Test Method for Critical Radiant Flux (Radiant Panel) of Floor.
ASTM F1869 – Standard Test Method for Measuring Moisture Vapor Emission Rate of Concrete Subfloor Using Anhydrous Calcium Chloride.
ASTM F2170 – Standard Test Method for Determining Relative Humidity in Concrete Floor Slabs Using insitu Probes.
1.4 SUBMITTALS
A. Submit product data in accordance with Section (01 30 00) (01 3300), INCLUDING manufacturer’s installation and maintenance instructions.
B. Submit three representative samples of Nydree acrylic impregnated flooring in the final color(s) or custom color(s), species and optional ‘UV-Oil’ finish, if desired as selected by the owner or their representative. Note: ‘UV-Oil’ Finish is not available on certain colors.
C. Installer Certification: Submit a list of at least three Engineered Hardwood flooring installations successfully completed within the past year requiring the same general degree of installation expertise.
D. Shop Drawings: Show floor pattern layout.
1.5 QUALITY ASSURANCE
A. Installer: Shall be experienced in the wood and/or vinyl tile flooring industry and shall have a minimum of five (5) years experience in the installation of similar products.
1.6 STORAGE, DELIVERY, AND HANDLING
Cartons of wood should be stored in dry, well ventilated storage areas or warehouses. Never store cartons of flooring outdoors. The idea storage environment should be maintained at 30-55% relative humidity and 60-90oF (15-32oC). Do not store cartons of flooring directly on warehouse floors.
B. Deliver the flooring to a preferred 60-90oF (15-32oC ), 30-55% relative humidity job site in unopened cartons. Protect flooring from exposure to moisture.
C. Cartons of Nydree Flooring will arrive to the job site wrapped in a polyethylene bag and typically shrink-wrapped to maintain the flooring at its most desirable installation moisture content. If material needs to be inspected prior to flooring installation, carefully remove the shrink-wrap and lift off polybag. After inspecting, put polybag back over pallet of flooring and secure with tape until installation. DO NOT REMOVE NYDREE FLOORING FROM THE POLYBAG UNTIL THE DAY OF INSTALLATION. (THE POLYBAG IS DIRECTLY BENEATH THE SHRINK WRAP). Flooring that has not been used within a day should be returned to the polybag until ready for installation. No acclimation time is necessary or desired when installing Nydree Flooring. Temperature of material and adhesives should be acclimated to 60-90oF (15-32oC).
1.7 ENVIRONMENTAL REQUIREMENTS
A. Provide permanent HVAC operation (2 week minimum) and permanent lighting prior to installation.
B. Maintain room temperature between 60oF (15oC) minimum and 90oF (32oC). The ideal relative humidity for Nydree Flooring installation is between 30% and 55%, prior, during and after the installation. Keep in mind that if the relative humidity drops below 30% for extended periods, the flooring could shrink causing surface splits and gaps.
C. Do not install flooring until all other significant construction work is complete. Moisture producing activities such as drywall, concrete, masonry, painting and grouting must be complete and cured.
1.8 WARRANTY
Nydree Flooring offers a Limited Lifetime Impregnated Wear Surface Warranty and Limited Lifetime Structural Defect Warranty. The Pedestrian finish offers a Limited Wear Through Warranty (3 years for commercial applications, 35 years for residential applications). Please contact Nydree Flooring for a complete copy of the warranty or visit the website at
2.1 MANUFACTURERS
A. Basis of Design: Product specified is “Nydree Engineered Acrylic Impregnated Hardwood Flooring” as manufactured by Nydree Flooring, LLC. Items specified are to establish a standard of quality for design, function, materials, and appearance. Installation adhesive, moisture retarder, and applicable maintenance materials shall be specified and manufactured by Nydree Flooring, LLC. Transition strips, trim moldings and stair treads/risers manufactured by Nydree Flooring, LLC are available; however, equivalent products by other manufactures are acceptable. The Architect will be the sole judge of the basis of what is equivalent.
2.2 MATERIALS
A. Laminated Flooring: Provide Nydree Engineered Acrylic Impregnated Hardwood Flooring as follows:
SELECT SPECIES BELOW. FOR EACH SPECIES RETAINED, SELECT APPLICABLE COLOR.
Species and Color: COR [Natural], [Bluebird], [Havanna], [Escondido], [Mint Green], [Tomato], [Walnut], [Sunrise], [Gothic], [Wenge], [Ice].
Species and Color: Reclaimed Oak [Natural], [Walnut], [Cashmere Gray]
Species and Color: Reclaimed Poplar [Natural].
Species and Color: Rustic Maple [Natural].
Species and Color: Radiata Pine [Natural], [Windy City Rain], [Everglade], [Caribbean Azul], [Cohiban], [Salsa], [Sassafras Falls], [Sunflower], [Ember Glow], [Chrome], [Bellaire].
Species and Color: Walnut [Natural], [Espresso], [Steel Gray].
Species and Color: African Mahogany [Natural], [Finally Alive].
Species and Color: Rift & Quartered White Oak [Natural], [Cinnamon Toast], [Starry Night], [Centennial].
Species and Color: Hickory [Natural], [Gunsmoke], [Saddlewood], [Mocha Rio].
Species and Color: Red Oak [Natural], [Harvest Wheat], [Winter Storm], [Cocoa Bayou], [Twilight].
Species and Color: Ash [Natural], [Vanilla], [Beaujolais].
Species and Color: Maple [Natural], [Down to Earth], [City Fog], [Fumed], [Bella Luna], [Latte], [Cider], [Midnight Run], [Noreaster Gray], [After Midnight].
Species and Color: Cherry [Natural], [Gettysburg Gray], [Essences De Rosa], [Winchester], [Ricco Rosso], [Moroccan Spice], [Cherico].
Species and Color: White Oak [Fumed], [Luxe].
Size:
Thickness: 3/8” (nominal) thickness, actual thickness 0.325 inch (8.26 mm).
SELECT WIDTH AND LENGTH BELOW.
COR, Reclaimed Oak, Reclaimed Poplar, Rustic Maple, African Mahogany,
White Oak Fumed & Luxe (4” and Accents Only)
Width and Length: Random Plank; 4 inches (101.6mm) wide by random length, 12 inches (305mm) to 47 inches (1194mm).
Width and Length: Accent; ½” inch (12.7mm) wide by random length, 12 inches (305mm) to 47 inches (1194mm).
Width and Length: Accent; 1 inch (25.4mm) wide by random length, 12 inches (305mm) to 47 inches (1194mm).
Width and Length: Accent; 1-1/2 inches (38.1mm) wide by random length, 12 inches (305mm) to 47 inches (1194mm).
Radiata Pine, Walnut, Rift & Quartered White Oak, Hickory, Red Oak, Ash, Maple, Cherry
Width and Length: Random Plank; 2-2/3 inches (67.6mm) wide by random length, 12 inches (305mm) to 47 inches (1194mm).
Width and Length: Random Plank; 4 inches (101.6mm) wide by random length, 12 inches (305mm) to 47 inches (1194mm).
Width and Length: Accent; ½” inch (12.7mm) wide by random length, 12 inches (305mm) to 47 inches (1194mm).
Width and Length: Accent; 1 inch (25.4mm) wide by random length, 12 inches (305mm) to 47 inches (1194mm).
Width and Length: Accent; 1-1/2 inches (38.1mm) wide by random length, 12 inches (305mm) to 47 inches (1194mm).
SELECT FINISH BELOW. NOTE THAT UV-OIL FINISH IS NOT AVAILABLE FOR THE COLORS SHOWN IN RED ABOVE. ALSO, KEEP IN MIND THAT UV-OIL FINISH MAY SLIGHTLY ALTER THE SHADE OF CERTAIN SELECTED COLORS.
Finish: Standard Factory-applied Pedestrian urethane containing aluminum oxide.
Finish: Optional Factory-applied UV-Oil Finish. Not available in the colors shown in red above.
Edge Detail: Micro-bevel.
Milling: Tongue and groove sides, end-matched.
Construction: Engineered multi-ply laminated construction; 1/10 inch (2.54mm) acrylic
impregnated wear layer shall be laminated to the multi-ply platform using non-
formaldehyde adhesive. Each plank shall meet or exceed Hardwood Plywood Veneer
Association (HPVA) Type II Bond Test.
Fire Ratings: Maple, Rustic Maple, Red Oak, Ash, Cherry, Reclaimed Poplar, Hickory, Rift & Quartered White Oak and African Mahogany flooring has a Class I rating when tested in accordance with ASTM E-648. COR, Reclaimed Oak, Radiata Pine and Walnut flooring has a Class II rating when tested in accordance with ASTM E-648.
Adhesive: Nydree Flooring UP-28-0VOC moisture-cured adhesive.
RETAIN BELOW ONLY IF CALCIUM CHLORIDE TEST RESULTS ARE EQUAL TO OR GREATER THAN 8 POUNDS (3.63 KG) PER 1000 SQUARE FEET (92.9 M2) PER 24 HOURS OR WHEN INSITU RELATIVE HUMIDITY RESULTS ARE EQUAL TO OR GREATER THAN 85% OR WHEN THERE IS CONCERN OVER FUTURE SUBFLOOR MOISTURE.
Moisture Retarder: Nydree Flooring OVR-8 Self-Leveling Moisture Retarder.
SELECT MAINTENANCE MATERIALS BELOW DEPENDING ON FINISH SELECTED.
Maintenance Materials:
Standard Pedestrian Finish: Bona Pro Series Hardwood Floor Cleaner and Nydree Flooring Dust Mop Treatment.
Optional UV-Oil Finish: Nydree Flooring Spray Buff Cleaner and Nydree Flooring Dust Mop Treatment. Restoration Product: Oil Finish Conditioner.
B. Accessories:
Reducers and Transition Strips: Acrylic impregnated type A reducer strips (wood to vinyl), type B reducer strips (wood to carpet), type C flat strips (wood to wood), T-molding and other manufacturer standard strips as indicated on the Drawings or, if not indicated, as selected by the Architect from the manufacturer’s standards, in the same species and colors as the laminated flooring.
Stairs: Acrylic impregnated flush stair nosing, stair treads (3/4” x 12” / 19mm x 304.8mm) with one side bullnose and risers (3/4” x 8” / 19mm x 203.2mm), in the same species and colors as the laminated flooring.
Length: 3 foot (914mm) pieces.
SELECT ABOVE OR BELOW.
Length: 6 foot (1829mm) pieces.
Trim Moldings: Non-impregnated ¾” (19mm) quarter round, 3” (76.2mm) and 4” (101.6mm) base moldings, and other manufacturer standard trim moldings as indicated on the Drawings or, if not indicated, as selected by the Architect from the manufacturer’s standards, in the same species and colors as the laminated flooring.
Length: Standard Random length, 6 (1829mm) to 10 (3048mm) foot pieces.
Finish: Finish accessories to match laminated flooring.
3.1 EXAMINATION
Concrete Subfloors
1. Verify that the substrate is clean, sound and free of wax, dirt, dust, mold, mildew, loose material, grease, oil, coatings, paint, rust, cutback, old adhesives (carpet), weak powdery concrete or gypsum, adhesive removers, efflorescence and other surface contaminants that will interfere with the bonding of the adhesive. Concrete surface sealers and curing compounds must be removed if present.
2. Verify that the substrate is flat to within 3/16” in 10 ft. (5mm per 3m). The substrate must be smooth, free from cracks, holes, voids, ridges, projections and other defects impairing performance or appearance.
3. Verify that new slab cure is a minimum of 30 days, preferably 60 days.
4. Verify that the concrete is clean, sound, free from contaminates and dry regardless of concrete age, history or grade level. Concrete must be less than 8 lbs./1000sq.ft./24 hrs using the Calcium Chloride Test Method (ASTM F1869) or less than 85% insitu relative humidity (ASTM F2170). The protocol for either moisture test must be followed precisely for warranty consideration. If both tests are performed, the insitu RH test is always the qualifying standard. Calcium Chloride Test kits are available from Nydree Flooring Customer Service. If any Calcium Chloride test is equal to or greater than 8 lbs. or the insitu relative humidity is equal to or greater than 85%, Nydree Flooring OVR-8 Self Leveling Moisture Retarder must be used prior to installing the flooring with UP-28-0VOC adhesive. Also if there is concern over any excessive future subfloor moisture, OVR-8 should be used prior to installing the flooring with UP-28-0VOC. See OVR-8 application bulletin at www.nydreeflooring.com.
B. Other Subfloors
1. Plywood Overlays, Structural Suspended Plywood Subfloors, Existing Wood Flooring, Acoustical Underlayments, Radiant Heated Floors (Hydronic), Terrazzo, Marble Tile, Ceramic Tile, Clay Tile, Existing Vinyl Tile or Sheet Vinyl as well as metal subfloors are all acceptable subfloors. Consult installation instruction guidelines.
C. All Subfloors
1. Coordinate work with that of other trades prior to installation so that no discrepancies may exist with installation of doors, frames, saddles, floor drains or any materials that would interfere in any other way.
2. Notify Architect of moisture test results and any unsatisfactory conditions. Do not begin installation until unsatisfactory conditions have been corrected. Beginning of installation means substrate and job site conditions have been accepted as suitable.
3.2 PREPARATION-CONCRETE SUBFLOORS
A. If a sealer, curing compound, bond breaker, densifier/hardener, prior adhesive or other surface coating has been applied, it must be completely “ground” off by diamond grinding, shot blasting or scarifying. Whenever possible, grind a concrete subfloor to tolerance rather than fill. Scour all concrete surfaces, except when using the floating installation method, using 3 ½ open coat (20 grit) sand paper. Sweep and vacuum substrate after scouring or grinding.
B. Use Portland cement-based filler to patch saw-cut control joints (score marks in concrete), old/construction seams(concrete), cracks, holes, voids, low spots, depressions, grooves, indentations and defects of small areas. Fill level with the surrounding surface. Do not fill or bridge concrete slab expansion joints. These joints must be carried through the flooring surface using an expansion joint covering system. DO NOT skim coat large areas with extremely thin layers of patching compound. Sand and/or scour patched areas smooth after material is fully cured according to manufacturer’s instructions. Use only quality materials and Portland cement-based patching products. Suggested patching products include: Bostik Fast Patch 102TM , Durabond WebcreteTM Ultra Finish and Durabond WebcreteTM 95.
C. If self-leveling underlayments are used, they must dry sufficiently (run moisture test) and dry hard (not dusty/powdery). Self-leveling underlayments must have a compressive strength equal to or greater than 2000 psi.. Gypsum-based self-leveling underlayments must be dry, “above-grade” installations where the gypsum has dried hard (not dusty/powdery), and the Gypsum has a compressive strength equal to or greater than 2000 psi.. Nydree Flooring can not be responsible for the strength, adhesion, or general performance of underlayments as proper compounding and preparation of subsurface are the responsibility of the installer. Suggested products include: Bostik SL-150TM and Durabond DuralevelTM 83P.
3.3 INSTALLATION
NOTE: A direct-bond (flooring is glued to subfloor) or floating installation (flooring is glued to underlayment felt) must be specified. Complete installation instructions for both types of installations are included in each carton of Nydree Flooring. A floating floor will utilize Nydree Flooring Underlayment Felt (The Felt is not glued to the subfloor). Direct Bond is always the preferred installation method.
A. [Direct Bond – Calcium Chloride Tests less than 8 lbs. or Insitu Relative Humidity results less than 85%]
1. Follow manufacturer’s installation instructions.
2. Spread UP-28-0VOC adhesive using a 3/16” x 5/32” (4,8mm x 4,0mm) V-notched trowel.
3. Install flooring per manufacturer’s instructions.
4. Roll floor with 150 pound (70kg) roller (100 pound plus 50 pound attachment) one hour after spreading adhesive, but not later than 2.5 hours. Be sure to roll in both directions (with plank and across plank).
5. Spread adhesive only over surface that can be finished within cure time of adhesive.
6. It is extremely important to remove excess adhesive while still fresh. Use mineral spirits and a white cloth. Cured adhesive is nearly impossible to remove.
7. Install trim, molding and transition strips per manufacturer’s installation instructions.
B. [Direct Bond – Calcium Chloride Tests equal to or greater than 8 lbs. or Insitu Relative Humidity results equal to or greater than 85%]
1. Follow OVR-8 installation instructions.
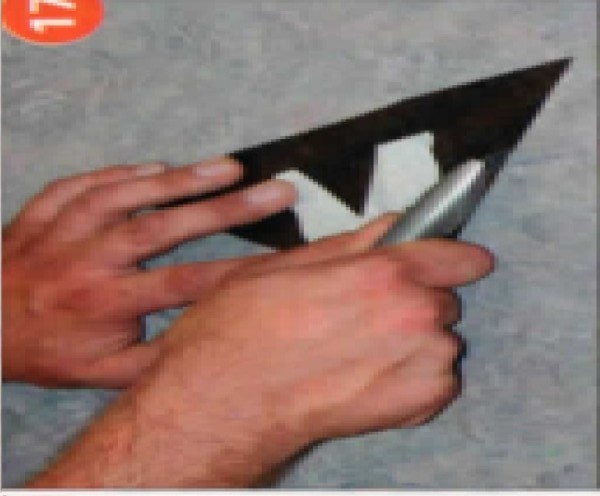
2. Apply OVR-8 using a 3/16” x 5/32” (4,8mm x 4,0mm) V-notched trowel to achieve a flat, uniformly thick 30-mil membrane (thickness of a credit card).
3. Allow OVR-8 to cure for a minimum of 12 hours.
4. Follow with plank installation using Nydree Flooring UP-28-0VOC adhesive.
C. [Floating Installation – Typically only specified when old resilient tile and mastic can not be removed.]
1. Follow Floating Installation Method in installation instructions.
2. For the floating installation method, concrete must be visibly dry and less than 3 lbs./1000sq.ft./24 hrs using the Calcium Chloride Test method (ASTM F1869) for warranty consideration. In areas of 1000 sq. ft. or less, conduct three tests. Add one more test kit for each additional 1000 sq. ft.. Test kits are available from Nydree Flooring. If any test is greater than 3 lbs., the floating installation method can not be used.
3. Underlayment Felt is 50” wide (127cm) and should be placed so that it is perpendicular to the finished flooring. Seams are butted without overlaps. The felt is not glued to the subfloor.
4. Expansion space is critical using this installation method. The required expansion space is ½”, but for areas larger than 24 lineal feet, use an additional ¼” expansion for each additional 12 linear feet.
5. Glue flooring to Underlayment felt using UP-28-0VOC adhesive as described in letter A above.
3.4 PROTECTION
Protect finished floor from abuse by other trades using heavy kraft paper or equivalent. Make sure the floor has been cleaned thoroughly (swept, vacuumed and dust mopped) prior to protecting, so that the flooring surface will not be scratched by debris. Avoid covering the installation with protective paper or equivalent for at least 24 hours. Keep traffic out of spaces and areas where flooring is being installed until adhesive has set. Light foot traffic after 10-12 hours. Normal traffic after 24 hours.
3.5 CLEANING
A. Nydree Flooring Sealed with Pedestrian Urethane: Prior to turning the floor over to the owner, it shall be thoroughly cleaned by sweeping, vacuuming or dust mopping to remove debris, followed by cleaning with Bona Pro Series Hardwood Floor Cleaner.
B. Nydree Flooring Sealed w/Optional ‘UV-Oil’ Finish: Prior to turning the floor over to the owner, it shall be thoroughly cleaned by sweeping, vacuuming or dust mopping to remove debris, followed by spray buffing with Nydree Flooring Spray Buff, a red pad, and a heavy (100 lb./45kg), low speed (175-250 rpm) buffing machine.
NOTE: This product has many advantages that can be forever ideal.
Contact F.C.I.S-CA for complete analysis.
6.

7. ACCLIMATION
HOW AND WHETHER TO ACCLIMATE WOOD FLOORING.
Wood flooring is a hygroscopic material subject to dimensional change as a result of variations in moisture, temperature and humidity in the surrounding environment. That has led to increasing awareness of the need to properly acclimate wood flooring before installation. Wood flooring simply needs to reach a moisture content level in equilibrium with the surrounding environment in which it will be installed, at or near normal living conditions. Always account for time of year and geographic location.
FINE TUNING ACCLIMATION
If acclimation is necessary, what is involved in "fine tuning" the acclimation process? First is knowledge of the area environment. A competent flooring contractor should check and record the moisture content of properly performing flooring installations on an ongoing basis. The checks should be made during all the different seasons. Moisture readings should also be taken on the flooring systems to determine what are typical or normal subflooring conditions for the area. This is the basis for establishing the moisture content range of wood flooring for the geographical area surveyed. For the most part flooring exposed too the first complete heating season will ac-climate to a winter base line and subsequent moisture changes will result from normal environmental changes. However, today's building practices can trap un-usual moisture in a home that can take more than a single year to normalize. Therefore, to be safe, flooring that has been in place 2- 3 years and exposed to an established environment will be considered well or “completely" acclimated to the typical area conditions. Readings taken of these installations should be
used for the base line.
This average yearly moisture content is the target acclimation for the best performing floors in the area. So you shouldn't acclimate to an excessively dry condition in the winter if your average will be higher during the rest of the year. Neither is acclimating to a wet site or extra acclimation during a very wet summer advised, when you know the house and flooring system will dry out next year. Next is the knowledge of the flooring product. Check the moisture content of the flooring. About 20 readings per pallet (@750 sq-ft/pallet) are necessary to get a representative assessment. Write them down, mark the range, and aver-age the readings. The readings should be of different bundles located in different
layers of the pallet. Since different pallets may be manufactured at different times this will include the associated variation. This will also raise a flag if one pallet is unusually different from the others.
Further, the overall range should be fairly tight with a 3 per-cent variation or less; 1 or 2 excessively wet or, "wild boards," does not mean a problem, but triggers an additional check. We now know the flooring moisture content and have established a target acclimation. If our readings show the average moisture content of the flooring is near the average for the area (within 1%), the flooring is considered acclimated enough for installation. If site conditions are ready, install the flooring. Any further pre-installation acclimation can be counterproductive since the site may not be at the target average. For a site finished floor after installation an additional acclimation period of 1-3 weeks is recommended. All the installed
flooring boards are now equally exposed to the environment. The individual boards that do vary from the average have the opportunity to acclimate further and the minor issues related to shrinkage and expansion will be taken care of during finishing.
Finally, if flooring is to be installed during the most extreme season acclimation to the average area MC can be very difficult. In these cases other than normal procedures may be necessary to accomplish acclimation. What if the average MC of the flooring is low and it is the dry winter season? Even racking the flooring will not allow acclimation to a higher MC and may over dry the flooring. So don't acclimate any further, add some field expansion spacing to accommodate the expected expansion after the winter heating. Also, with a site finished floor don't fill the expansion spaces during finishing. What if the average MC of the flooring for your area is too high, it is hot and humid and the subflooring is also near the maximum allowed MC? Acclimation to the lower MC will not occur. Cross stacking and covering the flooring with plastic while operating a dehumidifier under the plastic can reduce the MC of the wood. Turning the heat on can also help dry the site and the flooring. It will be important to monitor the MC of the flooring regularly to not over correct. For optimum flooring performance:
• Know your area's average and seasonal moisture content.
• Determine the moisture content of the flooring as delivered.
• Acclimate as necessary based on these readings.
Mickey Moore is currently the technical director of the Wood Flooring Manufacturers Association (NOFMA), a position he has held since 1988. He is a graduate of the University of Memphis with a degree in wood working technology and biology.
NOTE: Proper acclimation is usually misinterpreted.
Contact F.C.I.S.-CA for complete analysis.
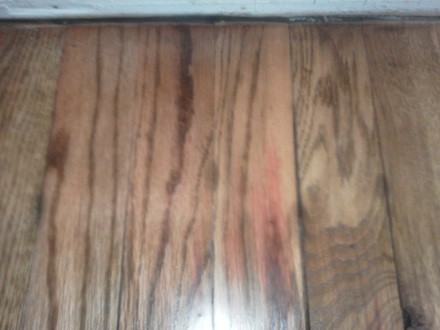
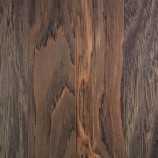
8. PATINA
PATINA
Technical Information \ Hardwood\Shading Changes in Hardwood Flooring
Color changes in hardwood flooring, patina, are a natural characteristic of all wood species. "Sun-shading", ambering or yellowing, and mellowing are terms frequently used to describe this occurrence. The color change may be slow, such as in American Oak or very rapid as in Brazilian Cherry. Domestic species that change color rapidly are American Cherry and Pecan/Hickory. Most imported exotic species are dark in color naturally, but darken even more and often do so very rapidly. Market trends have shown a dramatic increase in usage of lighter stained products or products with no stain at all. The use of stain camouflages the natural color changes associated with wood. For that reason natural or unstained products may show color change more rapidly than if they had been stained.
Technically the color change occurs in the lignin within the cell wall due to photochemical and oxidative chemical reactions. The rate of the chemical reaction is associated with the species, air, temperature, light and its intensity as well as the trace chemicals within the wood.
It is important to note that the process of aging; patina, is closely associated with the surface of the floor. Most color change only occurs .010" into the surface. A floor that has darkened beyond satisfaction may be lightly sanded (finish removal required) to remove the patina. It should be noted that the same color change would again occur.
NOTE: PATINA can be unknowingly undesirable and repairable.
Contact F.C.I.S-CA for complete analysis.
9. WOOD Flooring Glossary

A
Above-grade
Refers to the location of a finished floor where the floor is not in contact with the ground and which provides at least 18 inches of well-ventilated space.
Acrylic Impregnation
Liquid acrylic (and stain) injected throughout the surface layer of wood to fortify the fibers for added durability.
ADEX Awards
ADEX is an acronym for Awards for Design Excellence. It is the largest and most prestigious award for product design of furniture, fixtures and finishes marketed to designers. Armstrong vinyl sheet and laminate products are ADEX award winners.
Adhesive
A substance that bonds the floor to the subfloor.
B
Below-grade
Refers to the location of a finished floor that is in direct contact with the ground or with less than 18 inches of well-ventilated space.
Bruce Lock Installation
Installation method for Bruce Laminate flooring which features a unique tongue-and-groove profile that allows for easy installation of boards by just locking edges into place. No glue required. Offers the tightest fit and provides virtually seamless appearance.
C
Combination Base
A finishing molding piece used along the outermost edges of the floor where it meets the wall.
D
Dimensional Stability
The ability of flooring to retain its original dimensions during the service life of the product.
Distressed Visual
A design term that describes an aged, timeworn look.
DIY (Do it Yourself)
DIY is an acronym for “do it yourself,” referring to projects that can be installed without a professional. DIY levels range from easy to difficult. The more advanced levels require more complex tools and more DIY project experience.
DPL (Direct Pressure Laminate)
Direct pressure laminate is the most typical fusing method used to manufacture residential laminate flooring. With this method, the surface, inner layers and backing layer are fused in a single press operation.
E
Edge Detail
A term that describes the way hardwood and laminate board edges and ends are cut. Edges and ends are typically described as square, eased, beveled and microbeveled.
Embossed-in-Register
A manufacturing process that intensifies the depth, texture and realistic look of the floor by aligning the embossing with the printed design. This technique is used on Armstrong laminate and vinyl floor products.
Engineered
A term describing hardwood construction. Engineered hardwood boards are manufactured from multiple layers – or plies – of solid wood assembled in a cross-ply construction. The top layer reveals the wood species and color visible when the boards are installed.
F
Finish
The surface coating on pre-finished flooring. Usually either urethane or wax finish.
Floating
Installation method in which individual boards are glued only at edges and end joints, without direct attachment to the subfloor.
Floating Floor
A floor that does not need to be nailed or glued to the subfloor and can be installed over most existing floors, including concrete, ceramic, vinyl, wood and even some indoor/outdoor carpet.
Floor Protectors
Screw-on attachments for the bottom of chair and table legs to distribute the weight of furniture evenly in order to reduce indentations in resilient floors. Abrasions can be prevented with unique, replaceable felt pads on the floor protectors.
FloorScore™ Certification
FloorScore is a registered trademark of the Resilient Floor Covering Institute. Products with FloorScore Certification are guaranteed to meet or exceed low emission standards, will not adversely affect indoor air quality, and have passed a third-party certification process.
Full Bathroom
A bathroom with sink, toilet and bathing facilities including one or more of the following: shower, bathtub, Jacuzzi/whirlpool, spa, and sauna.
G
G3™ Wear Layer
This durable wear layer protects against wear, stains and fading. It offers the best resistance to scratches and indentations for your laminate floor.
Gloss Level
Different sheens that describe levels of gloss on the floor. They are: high gloss, semi-gloss, low gloss and ultra-low gloss.
Grade Level
Grade refers to the construction level relative to the ground around it. Below grade is below ground level, on grade is at ground level, and above grade is above ground level.
H
Half Bathroom
A bathroom with only a sink and toilet; no bath, shower or spa.
Hand-scraped
Also called hand-sculpted. Hardwood planks are individually hand-scraped to create distinctive, one-of-a-kind floors.
Hi-Definition Print Technology™
Print technology used to create extremely realistic patterns. Colors are vibrant and natural with intensified depth and realism. The embossing technology infuses the look with depth and texture.
Hi-Definition Print Technology™ with VTx™
Our premium laminate collections feature superior print technology with in-register embossing for realistic color, grain, intensity and depth.
HPL (High Pressure Laminate)
High pressure laminate is an extra-hard fusing process used to manufacture laminate flooring. The surface, inner layers and backing layer are fused in a multiple-step press operation. This process creates the most durable laminate construction.
I
Interlocking (Interlocking Floating)
An installation method that connects engineered hardwood or laminate boards to each other without the need for glue on the edges or ends. The boards lock together via a tongue-and-groove system. Interlocking floors “float” over the subfloor.
Installation Level
Refers to grade levels of the installation site.
J
K
L
Laminate Backing
A thermo-fused backing that provides additional strength and protection and ensures the floor stays flat, even when exposed to bottom-up moisture, which is particularly common with installations over concrete.
Laminate Flooring
Hard surface flooring utilizing a fiberboard core and Melamine wear layer that is available in blocks, planks, and squares and can be installed as individual units.
Laminate Flooring Glue
Adhesive used to bond the tongue-and-groove edges of laminate flooring. Now in a "peel-able" formulation for easy cleanup.
Laminate Image Layer
The look of your laminate floor, in choices as varied as the entire North American woodland.
Laminate Surface
A clear wear layer for super protection, even against the harsh punishment of sunlight, stains and burns.
Lock&Fold®
The industry’s fastest and easiest hardwood installation system. The system locks planks together without the use of glue, nails or staples.
Locking Installation System
Method of installing laminate flooring with a unique tongue-and-groove profile that allows for easy installation of boards by just locking edges into place. No glue is required. Allows for installation up to 50% faster than standard installation.
M
Magnum HDF™ Core
All Bruce Laminate floors have a Magnum HDF Core with thermo-fused backing that forms a moisture barrier. There’s no need to worry about spills soaking in or moisture wicking up from the subfloor. The Magnum HDF Core also eliminates the need to acclimate planks in the home environment, so you can buy them and install them the same day.
Magnum Plus HDF™ Core
Featured in select premium floors, our Magnum Plus HDF™ Core is structured to give you the sound of real hardwood, along with excellent sound absorption. This innovative technology also offers superior resistance to surface spills and subfloor moisture.
N
O
On-grade
Refers to the location of a finished floor with no part below ground, and with the floor and the ground in contact or separated by less than 18 inches of well-ventilated space.
P
Parquet
Inlaid woodwork in geometric forms, sometimes of contrasting woods, used in flooring. A common example is individual pickets of wood flooring, adhered together in groups of six pickets – then four picketed squares are alternately adhered to form a tile pattern.
Permion®
A hardwood floor finish that contains a high level of aluminum oxide for superior resistance to surface wear-through.
Plank
Board width is 3” or greater.
Ply (Plies)
Another word for a layer of wood, typically used to describe engineered hardwood construction layers.
Polyurethane
A type of finish used on hardwood to protect it from damage. Polyurethane finishes do not require waxing.
Prefinished
Hardwood floors that are stained with color and sealed with a protective finish by the manufacturer prior to installation.
Q
Quarter Round Molding
Detail piece that finishes the space where hardwood or laminate flooring meets the wall.
R
Reducer Strip
Molding that finishes the space between hardwood or laminate flooring and other flooring surfaces, like vinyl or carpet.
S
Site-Finished
Hardwood floors that are stained with color and sealed with a protective finish at the installation site by the installer. (the opposite of prefinished)
Solid
Manufactured from a solid piece of wood.
Species
Type of tree, such as oak, cherry or walnut. Different wood species have different levels of hardness that affect durability; graining, which affects the board’s look; and indigenous color, which can be kept natural or stained.
Stairnose
A finishing piece applied to the forward edge of stairs, step-downs and landings, creating a rounded quality finish.
Strip
Board width is less than 3".
Standard Engineered
The traditional construction for engineered hardwood boards and laminate products. These products require the pieces to be glued to each other prior to installing over the subfloor.
Structural Integrity
A term often used in a guarantee or warranty to assure the floor’s composition/construction will remain intact.
Subfloor
The structural layer intended to provide the home's floor support, which may receive floor coverings directly if the surface is appropriate, or indirectly via an underlayment if the surface is not suitable.
T
Texture
The term used to describe the surface look and feel of flooring. Textures can range from silky smooth to hand-scraped and distressed.
T-Molding
Molding piece that finishes the space between two areas of hardwood or laminate flooring. For laminate, it also fills the gap at doorways.
Transition Strips
Installation accessory that bridges two floors of different heights to equalize the height differential. Transition strips are functional and decorative.
Threshold
A finishing piece applied to the transition area where the wood transitions to another flooring level or another flooring type.
U
Ultraviolet Light
Ultraviolet (UV) light is part of the light spectrum. UV light wavelengths cannot be seen by the human eye.
Underlayment
Layer of material usually installed on or over a subfloor that provides a surface suitable to receive a new floor covering.
V
VapArrest™
An Armstrong exclusive installation aid for sealing concrete with excess moisture, prior to installing the floor.
VOCs (volatile organic compounds)
VOC is an acronym for volatile organic compounds, which are gases that can trigger allergic reactions, asthma and upper respiratory infections. All Armstrong floors have very low VOC levels.
W
Width
The width of the individual wood boards that make up the floor. “Strips” are narrow boards measuring less than 3 inches wide. “Planks” are wider boards, measuring 3 inches wide or more.
Wood species
The primary species from which the wood floor is made.
Wood Stain
A type of paint that is very "thin," or low in viscosity, and formulated so that the pigment penetrates the surface rather than remaining in a film on top of the surface. The stain is predominantly pigment or dye and solvent with little binder.
NOTE: This glossary is incomplete and more descriptions are available.
Contact F.C.I.S.-CA for complete analysis.
10. OAK
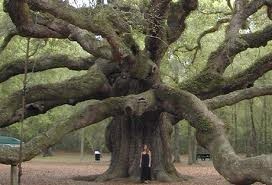
An oak is a tree or shrub in the genus Quercus ( /ˈkwɜrkəs/; Latin "oak tree"), of which about 600 species exist. "Oak" may also appear in the names of species in related genera, notably Lithocarpus. The genus is native to the northern hemisphere, and includes deciduous and evergreen species extending from cold latitudes to tropical Asia and the Americas.
Oaks have spirally arranged leaves, with a lobed margin in many species; some have serrated leaves or entire leaves with a smooth margin. The flowers are catkins, produced in spring. The fruit is a nut called an acorn, borne in a cup-like structure known as a cupule; each acorn contains one seed (rarely two or three) and takes 6–18 months to mature, depending on species. The live oaks are distinguished for being evergreen, but are not actually a distinct group and instead are dispersed across the genus.
Heart of oak beams of the frame of Saint-Girons church in Monein, France
Oak wood has a density of about 0.75 g/cm³, great strength and hardness, and is very resistant to insect and fungal attack because of its high tannin content. It also has very attractive grain markings, particularly when quartersawn. Wide, quarter-sawn boards of oak have been prized since the Middle Ages for use in interior paneling of prestigious buildings such as the debating chamber of the House of Commons in London, England, and in the construction of fine furniture. Oak wood, from Quercus robur and Quercus petraea, was used in Europe for the construction of ships, especially naval men of war, until the 19th century, and was the principal timber used in the construction of European timber-framed buildings. Today oak wood is still commonly used for furniture making and flooring, timber frame buildings, and for veneer production. Barrels in which red wines, sherry, and spirits such as brandy, Scotch whisky and Bourbon whiskey are aged are made from European and American oak. The use of oak in wine can add many different dimensions to wine based on the type and style of the oak. Oak barrels, which may be charred before use, contribute to the colour, taste, and aroma of the contents, imparting a desirable oaky vanillin flavour to these drinks. The great dilemma for wine producers is to choose between French and American oakwoods. French oaks (Quercus robur, Q. petraea) give the wine greater refinement and are chosen for the best wines since they increase the price compared to those aged in American oak wood. American oak contributes greater texture and resistance to ageing, but produces more violent wine bouquets. Oak wood chips are used for smoking fish, meat, cheeses and other foods. Sherry maturing in oak barrels
Japanese oak is used in the making of professional drums from manufacturer Yamaha Drums. The higher density of oak gives the drum a brighter and louder tone compared to traditional drum materials such as maple and birch.
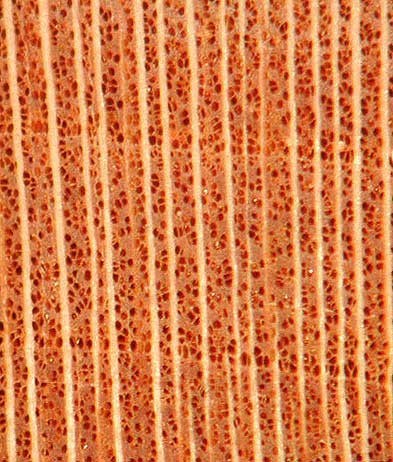
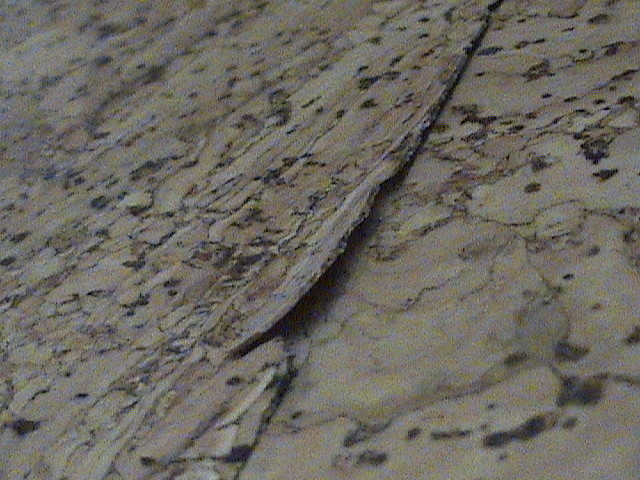
A cross section of the trunk of a cork oak, Quercus suber
The bark of the Cork oak, is used to produce wine stoppers (corks). This species grows in the Mediterranean Sea region, with Portugal, Spain, Algeria and Morocco producing most of the world's supply. Of the North American oaks, the Northern red oak is the most prized of the red oak group for lumber, all of which is marketed as red oak regardless of the species of origin. It is not good for outdoor use due to its open capillaries. One can blow air through an end grain piece 10 inches long to make bubbles come out in a glass of water. These openings give fungus easy access when the finish deteriorates. The standard for the lumber of the white oak group – all of which is marketed as white oak – is the White Oak. White Oak is often used to make wine barrels. The wood of the deciduous Pedunculate Oak and Sessile Oak accounts for most of the European oak production, but evergreen species, such as Holm oak and Cork oak also produce valuable timber.
The bark of the White Oak is dried and used in medical preparations. Oak bark is also rich in tannin, and is used by tanners for tanning leather. Acorns are used for making flour or roasted for acorn coffee.
Oak galls were used for centuries as the main ingredient in manuscript ink, harvested at a specific time of year.[citation needed] In Korea, oak bark is used to make shingles for traditional roof construction.
Biodiversity and ecology
Oaks are keystone species in a wide range of habitats from Mediterranean semi-desert to subtropical rainforest. For example, oak trees are important components of hardwood forests, and certain species are particularly known to grow in associations with members of the Ericaceae in oak-heath forests. A number of kinds of truffles, including the two well known varieties, the black Périgord truffle and the white Piedmont truffle, have symbiotic relationships with oak trees.
Many species of oaks are under threat of extinction in the wild, largely due to land use changes, livestock grazing and unsustainable harvesting. For example, over the past 200 years, large areas of oak forest in the highlands of Mexico, Central America and the northern Andes have been cleared for coffee plantations and cattle ranching. There is a continuing threat to these forests from exploitation for timber, fuelwood and charcoal.In the USA, entire oak ecosystems have declined due to a combination of factors still imperfectly known, but thought to include fire suppression, increased consumption of acorns by growing mammal populations, herbivory of seedlings, and introduced pests. In a recent survey, 78 wild oak species have been identified as being in danger of extinction, from a global total of over 500 species. The proportion under threat may be much higher in reality, as there is insufficient information about over 300 species, making it near impossible to form any judgement of their status.
Diseases and pests
See also: List of Lepidoptera that feed on oaks
Oak powdery mildew on pedunculate oak
Sudden Oak Death (Phytophthora ramorum) is a water mould that can kill oaks within just a few weeks. Oak Wilt, caused by the fungus Ceratocystis fagacearum (a fungus closely related to Dutch Elm Disease), is also a lethal disease of some oaks, particularly the red oaks (the white oaks can be infected but generally live longer). Other dangers include wood-boring beetles, as well as root rot in older trees which may not be apparent on the outside, often being discovered only when the trees come down in a strong gale. Oak apples are galls on oaks made by the gall wasp. The female kermes scale causes galls to grow on kermes oak. Oaks are used as food plants by the larvae of Lepidoptera (butterfly and moth) species such as the Gypsy Moth, Lymantria dispar, which can defoliate oak and other broadleaved tree species in North America.
A considerable number of galls are found on oak leaves, buds, flowers, roots, etc. Examples are Oak artichoke gall, Oak Marble gall, Oak apple gall, Knopper gall, and Spangle gall.
A number of species of fungus cause powdery mildew on oak species. In Europe the species Erysiphe alphitoides is the most common cause.
A new and as yet little understood disease of mature oaks, Acute oak decline, has been reported in parts of the UK since 2009.
Additionally, the Oak Processionary Moth (Thaumetopoea processionea) has become a serious threat in the UK since 2006. It defoliates the trees, and is hazardous to human health.
Toxicity
The leaves and acorns of the oak tree are poisonous to cattle, horses, sheep, and goats in large amounts due to the toxin tannic acid, and cause kidney damage and gastroenteritis. Additionally, once livestock have a taste for the leaves and acorns, they may seek them out. Symptoms of poisoning include lack of appetite, depression, constipation, diarrhea (which may contain blood), blood in urine, and colic. The exception to livestock and oak toxicity is the domestic pig, which may be fed entirely on acorns in the right conditions, and has traditionally been pastured in oak woodlands (such as the Spanish dehesa and the English system of pannage) for hundreds of years. Acorns are also edible to humans in processed form, after leaching of the tanins. They are a staple part of the forage consumed by wildlife, including squirrels and jays.
Cultural significance
Oak branches on the coat of arms of Estonia
National symbol
The oak is a common symbol of strength and endurance and has been chosen as the national tree of many countries. Already an ancient Germanic symbol (in the form of the Donar Oak, for instance), certainly since the early nineteenth century, it stands for the nation of Germany.In 2004 the Arbor Day Foundation held a vote for the official National Tree of the United States of America. In November 2004, Congress passed legislation designating the oak as America's National Tree.
Other countries have also designated the oak as their national tree including England, Estonia, France, Germany, Moldova, Latvia, Lithuania, Poland, the United States, Basque Country, Wales, Galicia, Bulgaria, and Serbia.[citation needed]
Oaks as regional and state symbols
The oak is the emblem of County Londonderry in Northern Ireland, as a vast amount of the county was covered in forests of the tree until relatively recently. The name of the county comes from the city of Derry, which originally in Irish was known as Doire meaning oak.
The Irish County Kildare derives its name from the town of Kildare which originally in Irish was Cill Dara meaning the Church of the Oak or Oak Church.
Iowa designated the oak as its official state tree in 1961; and the White Oak is the state tree of Connecticut, Illinois and Maryland. The Northern Red Oak is the provincial tree of Prince Edward Island, as well as the state tree of New Jersey. The Live Oak is the state tree of Georgia, USA.
The oak is a national symbol from the Basque Country, specially in the province of Biscay, and Germany.
Military use
Oak leaves are traditionally an important part of German Army regalia. They also symbolize rank in the United States Armed Forces. A gold oak leaf indicates an O-4 (Major or Lt. Commander), whereas a silver oak leaf indicates an O-5 (Lt. Colonel or Commander). Arrangements of oak leaves, acorns and sprigs indicate different branches of the United States Navy Staff corps officers. Oak leaves are embroidered onto the covers (hats) worn by field grade officers and flag officers in the United States armed services.
If a service member earns multiple awards of the same medal, then instead of wearing a ribbon or medal for each award, he or she wears one metal representation of an "oak leaf cluster" attached to the appropriate ribbon for each subsequent award.
Political use
The oak tree is used as a symbol by a number of political parties. It is the symbol of the Conservative Party in the United Kingdom,[27] and formerly of the Progressive Democrats in Ireland.[28] In the cultural arena, the oakleaf is the symbol of the National Trust (UK) and The Royal Oak Foundation.[citation needed]
[edit] Religious
In Baltic mythology, the oak is the sacred tree of Latvian Pērkons, Lithuanian Perkūnas and Prussian Perkūns. Pērkons is the god of thunder and one of the most important deities in the Baltic pantheon.
In Celtic mythology, it is the tree of doors, believed to be a gateway between worlds, or a place where portals could be erected.[citation needed]
In Norse mythology, the oak was sacred to the thunder god, Thor. Some scholars speculate[weasel words] that the reason for this is that the oak – the largest tree in northern Europe – was the one most often struck by lightning. Thor's Oak was a sacred tree of the Germanic Chatti tribe. According to legend, the Christianisation of the heathen tribes by Saint Boniface was marked by the oak's being replaced by the fir (whose triangular shape symbolizes the Trinity) as a "sacred" tree.
In the Bible, the oak tree at Shechem is the site where Jacob buries the foreign gods of his people (Gen. 35:4) . In addition, Joshua erects a stone under an oak tree as the first covenant of the Lord (Josh. 24.25-7). In Isaiah 61, the prophet refers to the Israelites as "Oaks of Righteousness".
In Slavonic mythology, the oak was the most important tree of the god Perun.
Historical
Several individual oak trees, such as the Royal Oak in Britain and the Charter Oak in the United States, are of great historical or cultural importance; for a list of important oaks, see Individual oak trees.
"The Proscribed Royalist, 1651", a famous painting by John Everett Millais, depicted a Royalist fleeing from Cromwell's forces and hidden in an oak. Millais painted the picture in Hayes, Kent, from a local oak tree that became known as the Millais Oak.
Approximately 50 km west of Toronto, Canada is the town of Oakville, ON, famous for its history as a shipbuilding port on Lake Ontario.
NOTE: Oak has many advantages.
Contact F.C.I.S.-CA FOR COMPLETE ANALYSIS.
11. FLOOR SHRINKAGE & EXPANSION
Floor Shrinkage and Expansion
There are very strong opinions about the movement of wood flooring installations but very little factual information. If you don’t want a floor to shrink, you have two alternatives. You can (1)
Maintain a constant relative humidity in your environment; or (2) Don’t use wood.
If the wood moisture content (equilibrium Moisture Content or EMC) changes, wood will change dimensions. Even if you maintain constant relative humidity, the wood may shrink or
expand, if the wood has not has time to properly acclimate to ambient humidity level before being installed.
Another major factor is the moisture content of the material beneath the wood floor itself. Moisture moved into a wood floor from the air above and the substrate below.
A little change in moisture may not seem like a big deal. It is! A 12-foot wide room, done with plain-swan oak or maple is likely to expand or contract by as much as three inches under the
humidity swings commonly experienced in much of the United States.
But, Hey! Finishes are supposed to seal the wood so moisture won’t penetrate the wood, right? Wrong, most floor finishes are good barriers to penetration against the movement of water in vapor
form.
A coating’s inherent resistance to water vapor transmission is considerably less important than the film thickness characteristic of the different types of coatings. Once finished
boards separate and break the integrity of the surface film, surface resistance becomes even less if a factor. Or, if the floor is open to space below, such as a basement, the
coating on top of the floor becomes less important.
A lot of people believe. And rightly so, that water-based finishes have films that are very tough, yet very elastic. So though and so resilient that they won’t allow the integrity of the film
to fail, right? Wrong again! Even though water based finish components have outstanding strength and elasticity, the finish thickness is only about .003 of an inch. Consequently, the
total force created by nailing. Nailing forces are of the magnitude requires to split the wood. Flooring is usually installed so tightly that if a closed crack opens just 1/32 of an inch,
it will stretch the coating over the crack by several hundred percent. Eventually the film of coating will split, allowing the board to separate even further, which is considered normal floor
movement. Understanding the normal movement of wood floors and the causes for it will help you and your customers understand these natural forces of nature.
If you want to check some of these things out, I suggest you take a look at some handy reference books.
One is Understanding Wood – A Craftmans Guide to Wood technology by R. Bruce Hoadly (The Taunton Press, Inc.) Also Useful as a reference material are Volume IV of the
Handbook of Materials Science by Robert Summit and Alan Sliker (CRC Press, Inc.) and the Wood Handbook: Wood as Engineering Material by the U.S Forest Products Laboratory, U.S Government Printing
Office, stock number 0100-03200.
These are both interesting and useful to people who live wood and like to work with it. Knowing more about the material you work with will help bring out its inherent beauty, durability, and
functionality.
NOTE: Shrinkage can be environment related,
a characteristic, an installation error, or a mill-defect.
Contact F.C.I.S.-CA for complete analysis.

12. CHECKING
NWFA Tip Sheet: Engineered Flooring Issues
by Mickey Moore
March 22, 2010
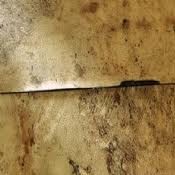
CHECKING
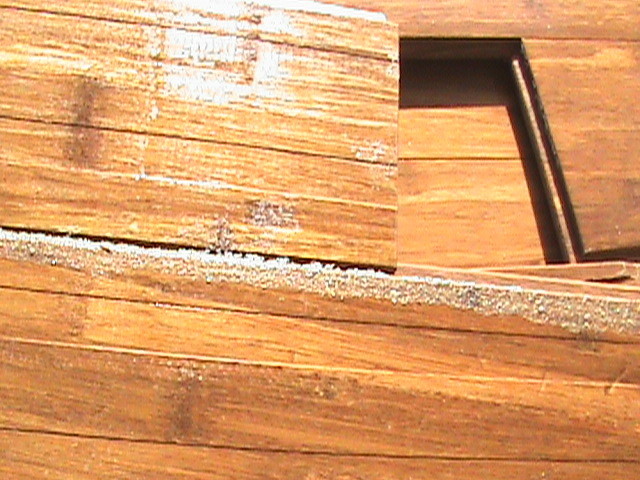
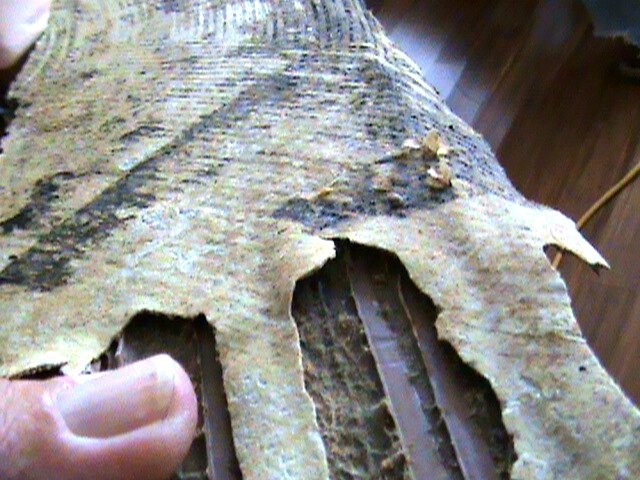
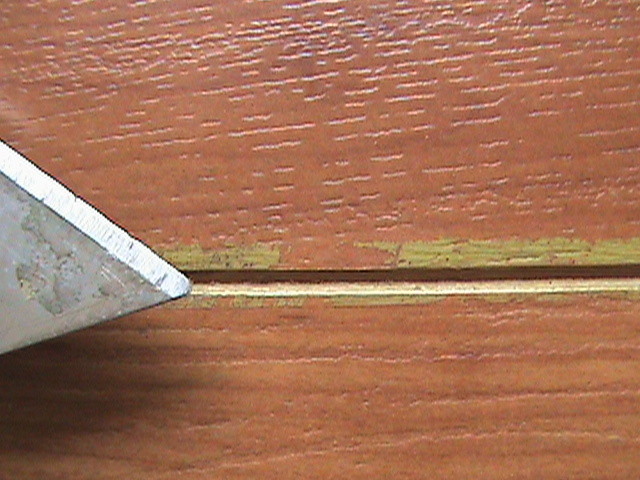
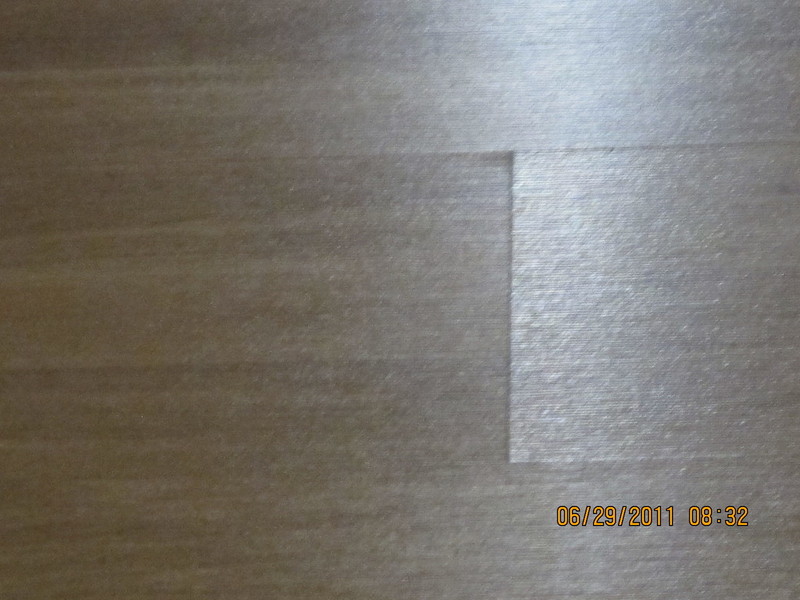
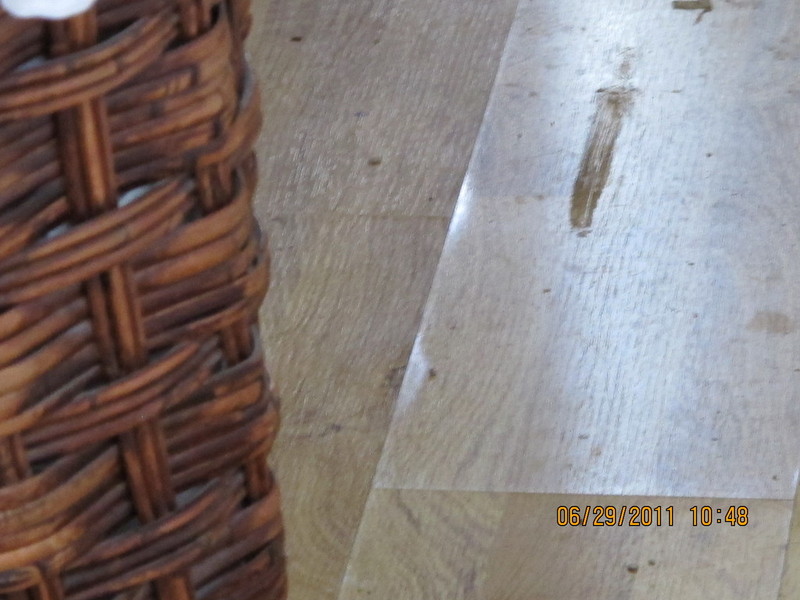
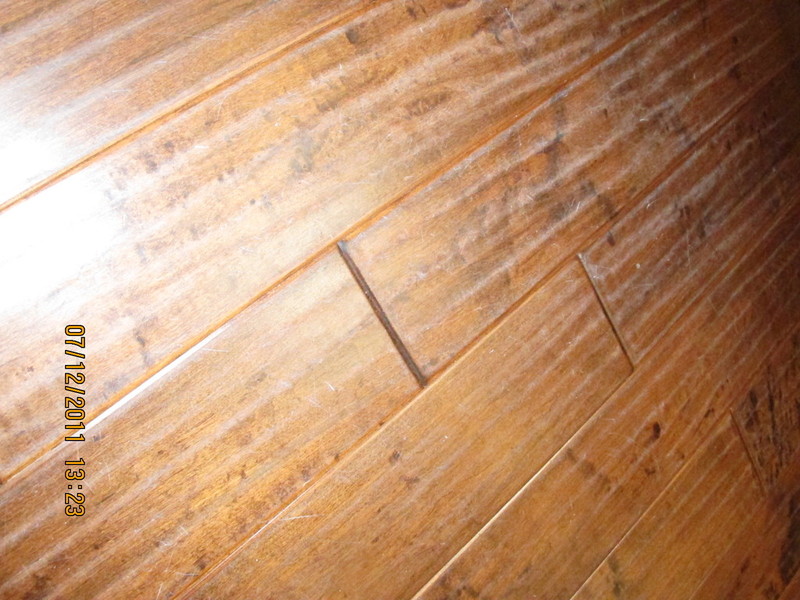
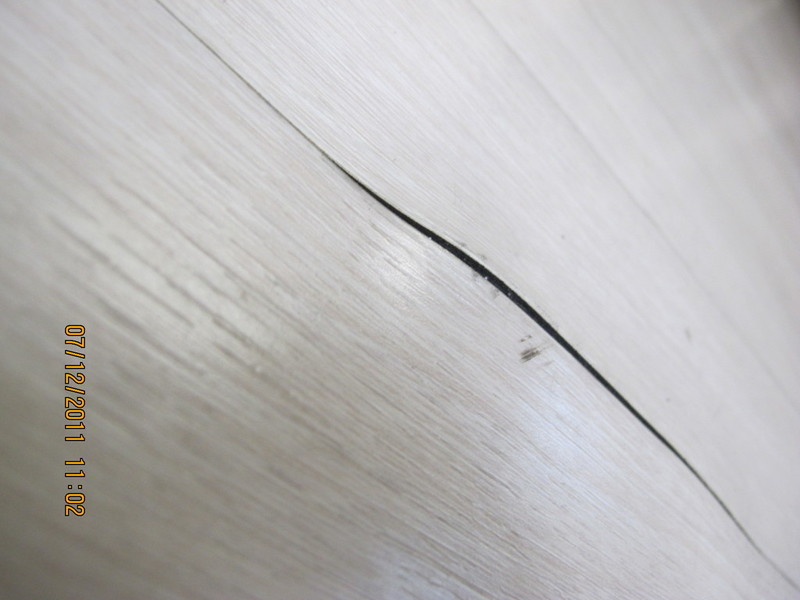
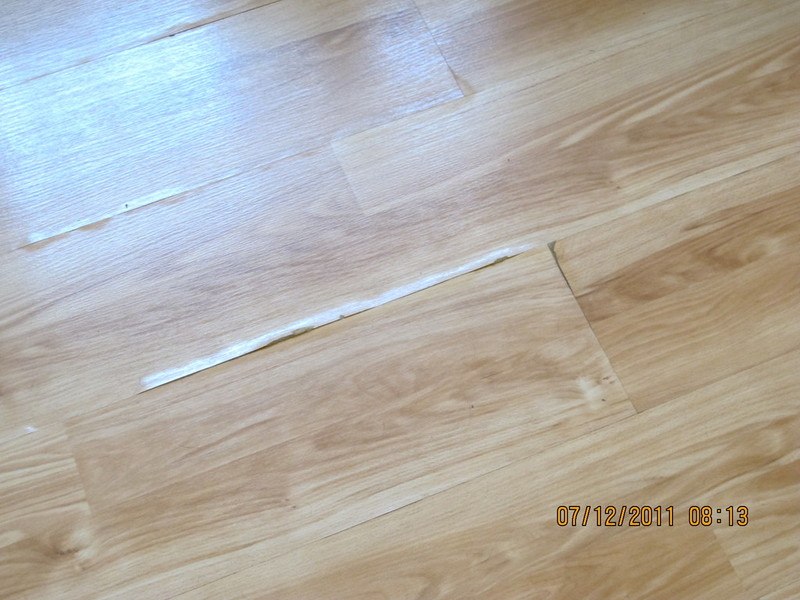
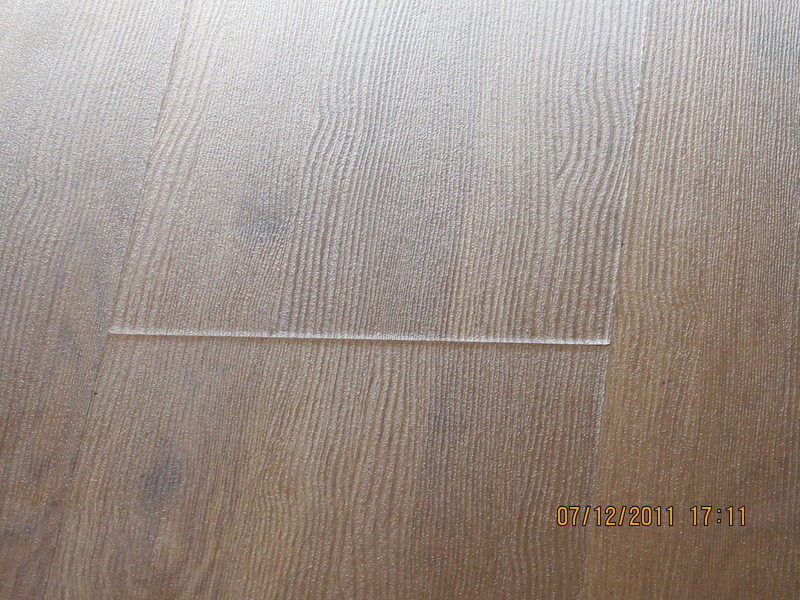
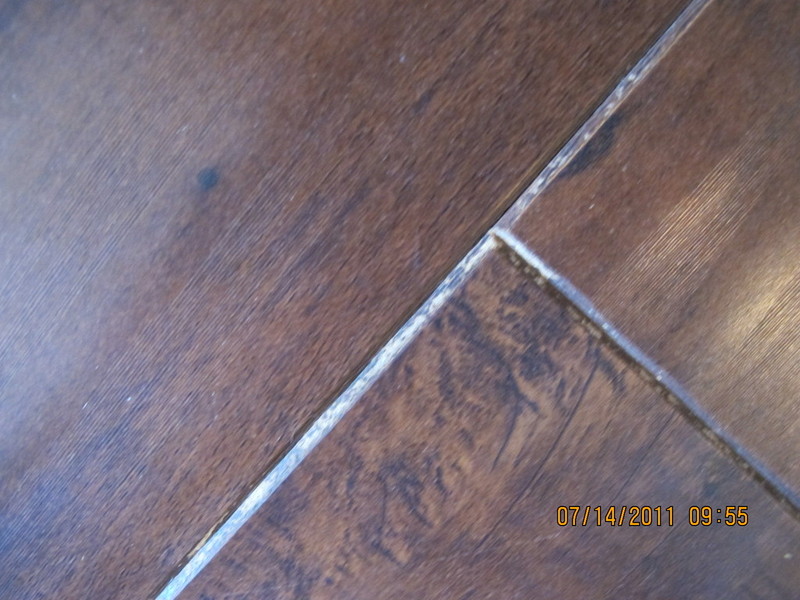
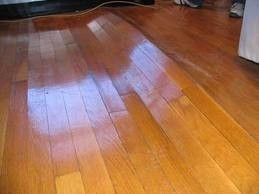
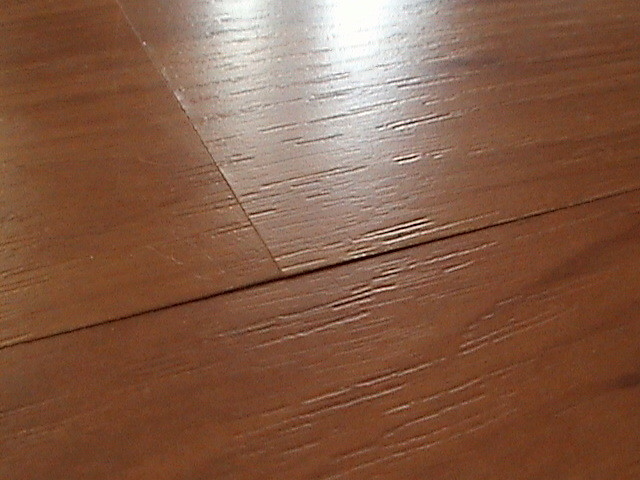
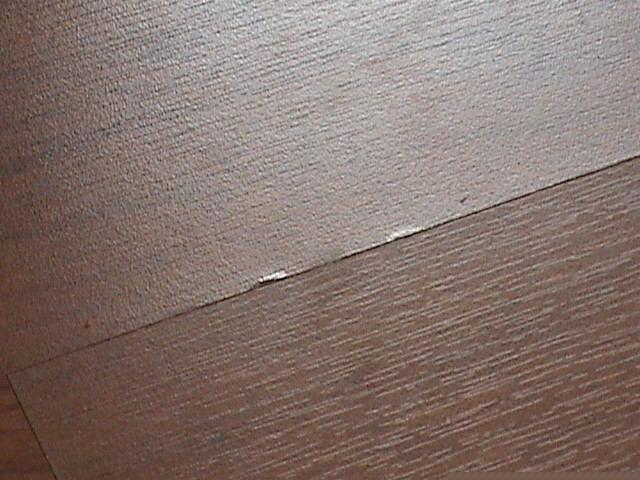
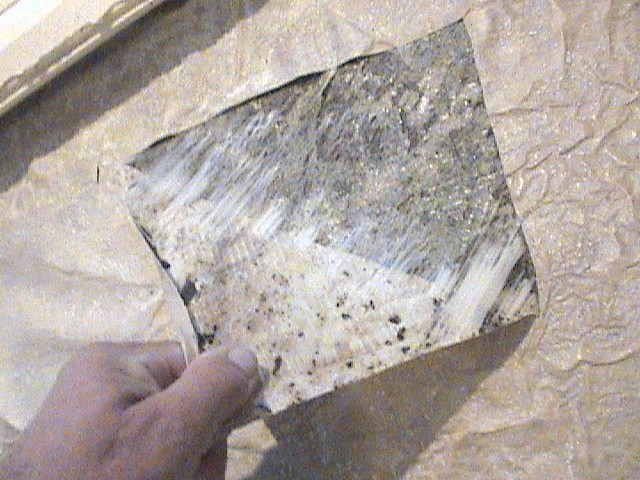
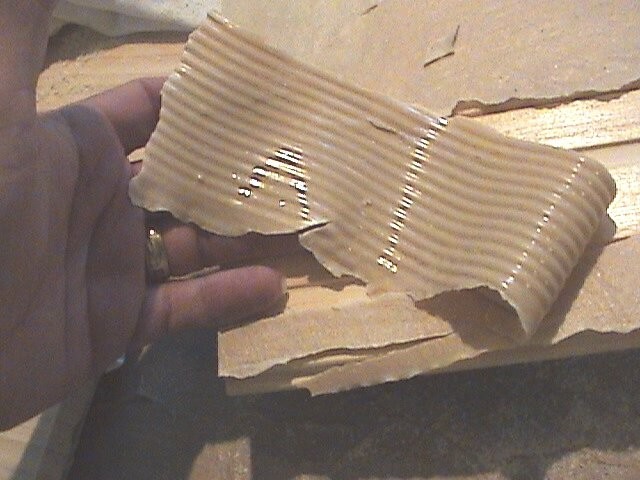
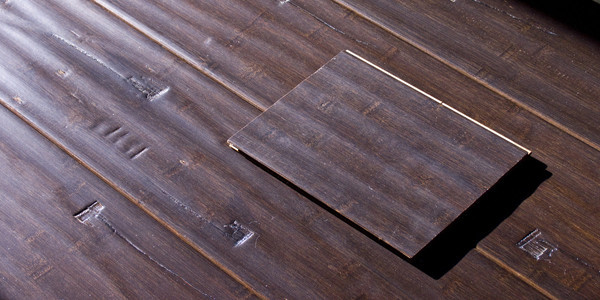
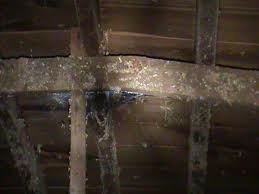
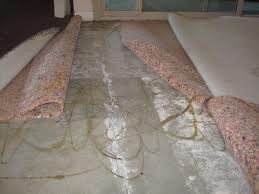
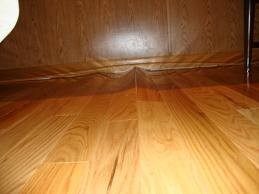
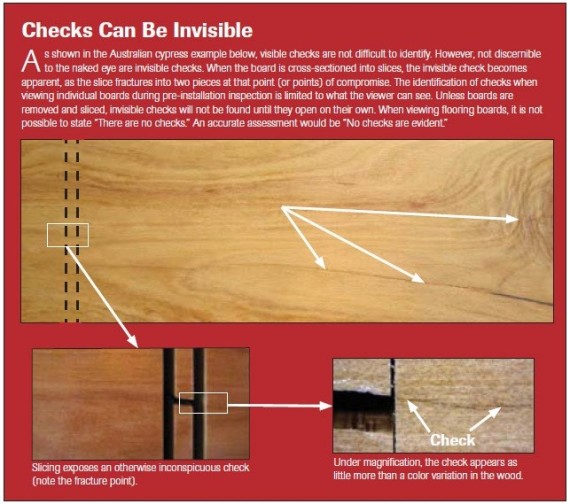
A notable concern with engineered flooring is cracks in the face of boards. (Photo 5 and 6) This can be a very tricky issue to address. First, cracks in the face of flooring associated with checking, are inevitable to some extent. All wood will develop checks during the drying process. How many checks, and how severe in width and depth? It depends on the drying process and species involved. In addition, the manufacturing process for engineered flooring can create checks particularly with rotary peeled product when the curved wood sheet is flattened. Not only is there stress from bending it flat but the actual process of cutting the log with a knife fractures the wood. Even with sliced veneers the cutting action creates checks. These fractures and checks can become visible and, depending on the number and severity, become objectionable.
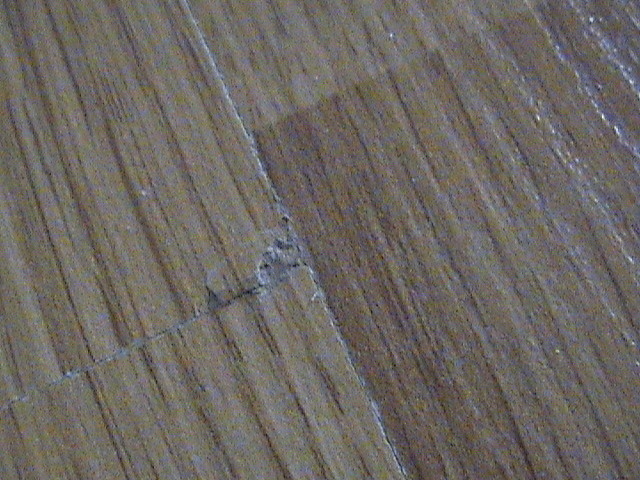
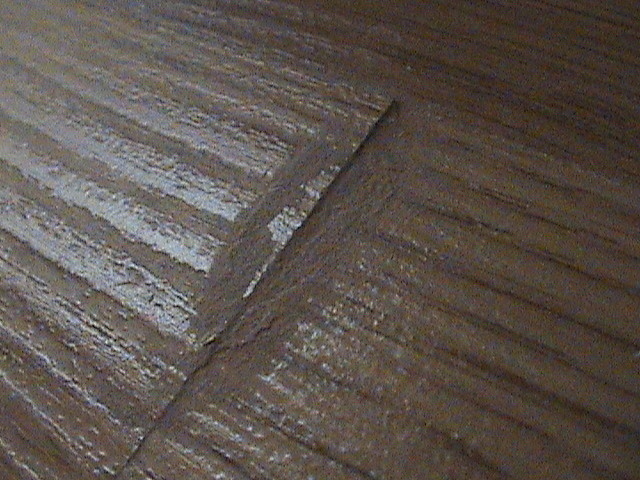
Most of the time the lay-out and engineering of the veneers help to keep the checks from becoming visible. The plies below the face restrict movement of the face and the checks move very little as conditions change and so are not visible. However, if the face moves at a different rate from the lower plies or the lower plies move differently from the face the checks/fractures can become visible. This can occur if the face veneer is at a higher moisture content than the lower plies. As the face shrinks to the condition of the lower plies, the lower plies resist the movement and the shrinkage occurs as space where the fractures or checks are. (Photo 7) Another influencing factor is the stretch of the finish that is put on the flooring. As the movement occurs and the small fractures open, some finishes are elastic enough to not fracture over the crack, while others fracture readily.
In order to avoid some of the movement the customer should be advised of the manufacturers’ recommendations for interior relative humidity which influences change in the moisture content of wood products. Some engineered flooring product directions require that the relative humidity be maintained in the home between 35% and 55% (some 40% to 60%, or 50% to 60%, or 30% to 50%) in order for the products to perform as expected. In areas where these required conditions require extra environmental controls, the consumer should be advised that associated mechanical equipment should be in place. However, in those cases where the face veneer and the lower plies were originally put together at different moisture contents, the face fractures/checking may be unavoidable. In many cases the flooring contractor is ultimately held accountable for installing in conditions where relative humidity did not conform to the required conditions.
NOTE: CHECKING is not always a mill defect.
Contact F.C.I.S.-CA for complete analysis.
13. TRY TO AVOID CHECKING
Hardwood Plywood & Veneer Association — Distributor Division Vol. 2 June 1998
Common sense tips and suggestions for quality woodworkers, cabinet makers, furniture manufacturers, and anyone who uses hardwood plywood!
Preventing Checking and Warping in Wood Veneered Panels
Properly manufactured wood products sometimes develop moisture–related problems after leaving the factory. In some instances, the problems do not appear until after the product has been in service as a component in a piece of furniture, cabinet, or other wood article. To control such problems, it is essential to avoid exposure of these products to extremes in humidity and temperature over all stages of the product life cycle, including shipping, storage, secondary processing, and use. Wood veneered panels, in particular, are sensitive to moisture extremes and may develop face veneer checking and/or warping if not cared for correctly.
The moisture level in wood fluctuates depending on the relative humidity and temperature to which it is exposed. Extreme weather and seasonal climatic changes have the potential to cause changes in wood moisture levels of sufficient magnitude and duration to cause problems. Wood tends to expand as it gains moisture and to contract as moisture is lost. Expansion and contraction both create stresses within wood. Thus, extremes in moisture exposures can create excessive stresses in wood veneered panels and cause face veneer checks and/or panel warpage.
These basic steps are recommended to help prevent checking and warping in wood veneered panels:
1. During transit, cover the shipment to protect it from excessive moisture.
2. In storage, protect panels from the elements and extremes in relative humidity and temperature.
3. In processing, maintain relative humidity and temperature in a range that is compatible with the expected conditions in the service environment, using climate control systems if necessary.
4. Apply a finish coating that will help retard moisture movement in and out of the panel, reducing the impact of any drastic, sudden humidity and/or temperature changes. Finishing both panel surfaces will also serve to maintain the moisture balance, which helps to minimize warpage. When applying finishes, avoid over saturation of the panel surface.
5. In the service environment, use climate control systems if necessary to maintain the relative humidity and temperature within the appropriate ranges as indicated below1:
Most areas of the United States: 30 — 55% R.H.
Dry Southwestern U.S.: 20 — 50% R.H.
Damp, warm Eastern U.S. coastal areas: 40 — 70% R.H.
Temperature should be maintained within a range of 60 — 90ºF. As another important precaution, do not put wood items too near or directly facing air vents or radiant heat sources. Conditions in these areas may be at extremes that will cause nearby wood products to become either overly dry or overly moist.
1Based on U.S.D.A. Wood Handbook 72
NOTE: Can you anticipate or for see CHECKING?
Contact F.C.I.S.-CA for complete analysis.
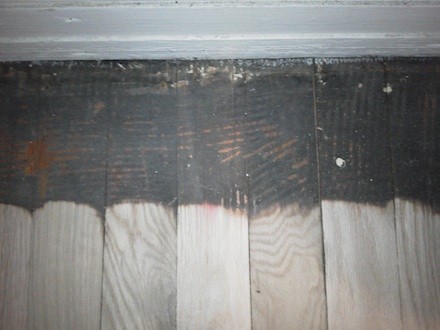
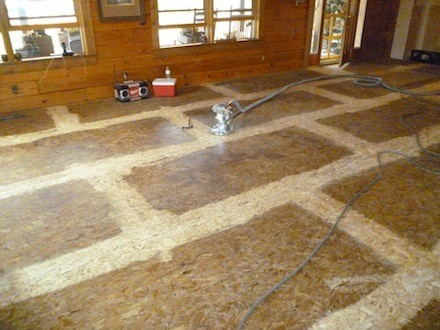
14. OLD FLOORS

Old Floors
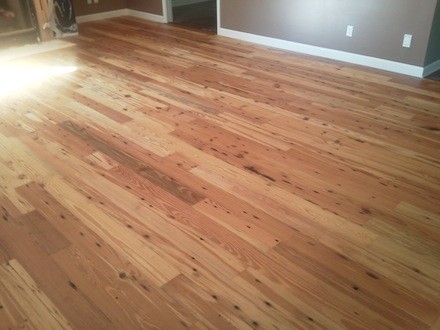
Oak floors are sturdy, reliable and beautiful. They give so much and ask so little. We have tracked mud over them and our pets have wreaked unspeakable mayhem upon them; yet, our floors have remained good friends. Like every good friend, it’s time we give them the attention that they deserve.
With a little care and maintenance you can enjoy gorgeous floors as if they had been through by a professional. The process is much easier now, compared to years passed, because of advancement in tools and finishes. We can restore their once vibrant appearance byrefinishing like the pros.
To begin the job of floor refinishing, keep in mind that the two most crucial aspects ar proper floor sanding and selecting an appropriate finish.
Although there are many professional grade finishes out, there aren’t many available to homeowners that are water-based. This is because even water-based finishes contain materials that are considered hazardous, often giving off strong fumes. Because of this, distributors will only sell them to floor contractors.
The best option for homeowners is a polyurethane-water hybrid. Homeowners are offered a non-catalyzed finish. Like water-based coatings, it is low odor, fast-drying and durable.
Another important advantage is the ability to re-coat as soon as it dries. This means that within a few hours you will be applying another coat. By re-coating within 24 hours of the initial application you won’t have to sand the existing finish. This allows a finish to create a chemic known as hot coating, as opposed to the mechanical bond that sanding process.
Finally, a note on whether pre-finished floor can be renewed to a former luster as a result of age. Some manufacturers recommend against their products being refinished; nevertheless, ZAR ultra Max, which is also water-based polyurethane, is an excellent option for just such a job.
NOTE: OLD FLOOR restoration can be complicated.
Contact F.C.I.S.-CA for complete analysis.
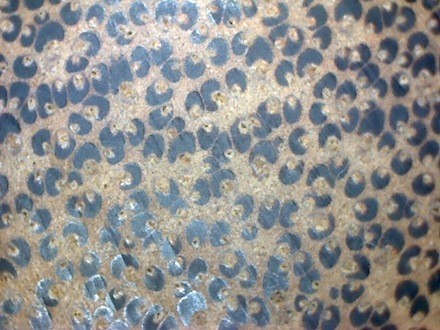
15. POWDER POST BEATLES
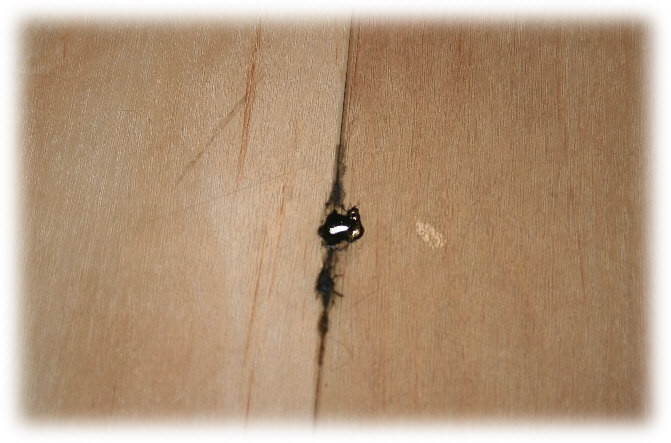
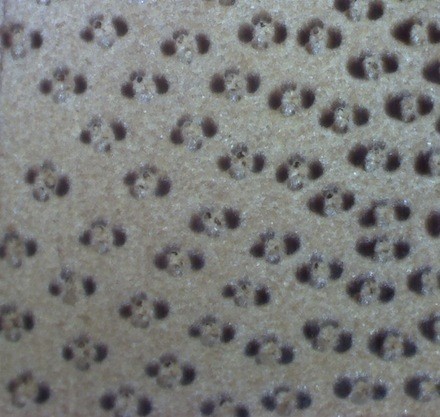
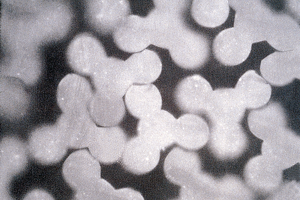
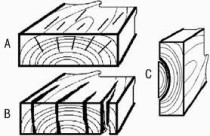
Powderpost Beetle, Lyctus spp.
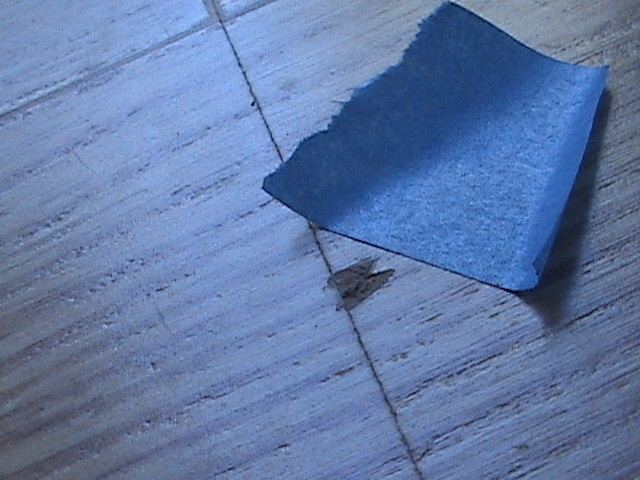
Symptoms: Most powderpost beetle infestations are in wood or wood products before the wood is purchased. Because development is slow and inconspicuous, the infestation may be several years old before they are discovered. There is no need for extreme haste in treatment. Carefully inspect wood at the lumbermill, lumberyard, or other storage area. Individuals remodeling or renovating old buildings and salvaging lumber from old wooden structures should be cautious. Farm-sawed lumber is often a source of infestation. Dust off the suspected wood surface and wait 24 hours to notice whether fresh dust appears around emergence holes. Live beetles or new exit holes indicate activity. Wood no longer infested need not be treated, but weakened timbers may need to be replaced. It may also be simpler to replace infested wood if only a small area of trim is involved. Most wood-infesting beetles will not reinfest wood that is painted, varnished, waxed, or shellacked. Larvae already in the wood at the time it is finished (varnished-lacquered) will develop and emerge. Wooden artifacts or furniture can be super cooled at 0 F for several weeks or super heated at 140 to 150 F for two to four hours to kill infestations. For new construction, use kiln dried lumber (dried a minimum of eight hours at 130 to 140 F and 80 percent relative humidity). Most beetles do not develop in wood with a moisture content below 10 to 15 percent.
Life Cycle: The length of the life cycle for lyctids is usually three months to one year, but this can be extended to several years depending on species, temperature, and starch content of the wood. It is not unusual to have infestations reported in newly constructed homes. Newly emerged adults mate and the females lay eggs on or in the pores of wood. Lyctids and anobiids may reinfest the wood from which they emerged while bostrichids seldom do.
Description: Adult lyctids are flattened, slender, reddish brown to black, and vary from 3/32 to 7/32 inch long. The antennae have a two-segmented club. The head extends forward and is visible from above. The most common species in Oklahoma is the southern lyctus beetle (Lyctus planicollis LeConte). The following discussion will apply mostly to this species; however, biology and control of most other species is quite similar.
Control: Please contact your local county extension office for current information.
Not all apparent signs of infestation should be of any concern. There are many characteristics a professional wood inspector should discover. Environment, history, and signs on the material will tell stage of the infestation, and give good direction for its cure.
QUESTIONS email to: floorcovering@cox.net
16. TYPES OF CUTS OFF LOGS
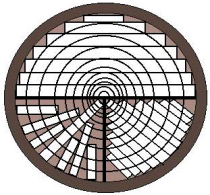
Rift & Quartered Lumber
Plain Sawn Technique
(Top Half)
Quarter sawing produces both Rift and Quartered
(Bottom Half)
Rift lumber is lumber where by the growth rings are 30° to 60°. Plain sawn lumber has growth rings that are less than 30°.
By definition, quartered sawn lumber produces lumber where by the growth rings are positioned at a 60° to 90° angle.
The most obvious characteristic of quarter sawn lumber is the type of grain pattern produced. By quarter sawing, the saw actually splits the medullary ray, causing the ray to appear shiny or reflective. (The German term for this is “spiegel Shnitt” or “mirror cut”.). The rift board does not have this shiny charachteristic. It does produce vertical grain - usually used in more contemporary setting specified by archetects.
Appearance is not the only reason why quarter sawn is sought after. It also:
• Does not shrink or swell in width (ideal for flooring in extreme conditions (high traffic, pubs, and other public places.
• Reduces twisting, warping, and cup.
• Wears less in flooring application.
• Does not surface check or split.
• Produces a better paint surface.
As described, quarter sawing is more of an art than plain sawing. Quarter sawing takes larger logs to saw this product, more production time is sawing each “quarter”, all of which equates to a premium price.
NOTE: CUTS have benefits to all types of environments.
Contact F.C.I.S.-CA for complete analysis.
17. DETERMINING RELATIVE HUMIDITY
Determining Relative Humidity
Relative Humidity is a characteristic of air. When the relative humidity is high, the air feels clammy or muggy. We may sweat more and have a hard time staying cool. When the relative humidity is low, our lips get chapped, skin dries and cracks, and things contacting our skin feel a little rougher. Other living (or once-living) things like plants, insects, mold and wood also react to changes in relative humidity.
Relative humidity is a ratio or the "relative" amount of moisture in the air, as compared to the maximum amount of moisture the air can hold at that temperature. For example, air with a relative humidity of 50% contains one half the amount of moisture the air can hold at that temperature. Warmer air can hold more moisture than colder air, so when air is warmed, its relative humidity decreases. Air a 70 degrees and 50% RH will have a RH of only 25% when heated to 90 degrees. Conversely, the 70 degree, 50% RH air will have a 100% relative humidity when cooled to 50 degrees. 1111111
Controlling relative humidity in a building is important because of its affects on both the structure and living organisms within the building. People are most comfortable in a relative humidity of 30-60% while mold grows best at relative humidity over 80%.
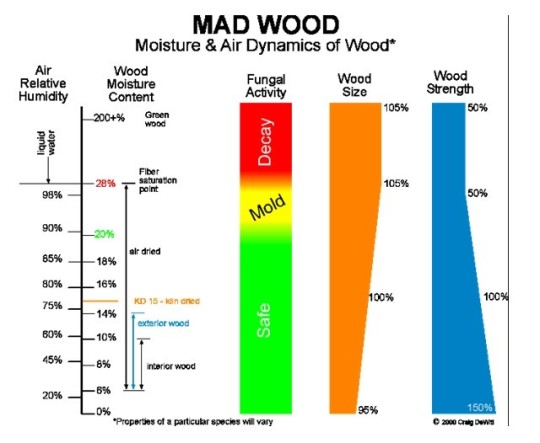
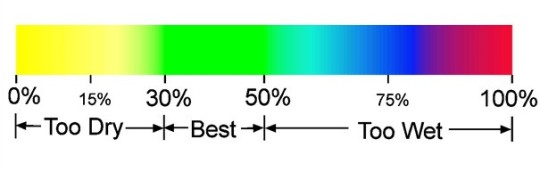
Condensation occurs when a surface is cooler than the dew point temperature of the air next to the surface. At this temperature, the air becomes saturated with water. This is equivalent to 100% relative humidity. When condensation occurs, mold and decay are very likely. Mold can grow when the air is damper than about 80% relative humidity. To help locate potential problem spots , use the following calculator to determine temperatures where condensation, decay and mold may occur on surfaces exposed to outside summer air. Then look for locations in and around the house that are cooled below these temperatures. A critical situation seems to occur quite often when the summer thermostat setting is set below the condensation temperature of the outside air.
Dust mites like a relative humidity over 60%, and can be controlled by maintaining a RH below 50%. Wood expands at higher RH, and shrinks at low RH. Situations where hardwood floors cup, warp or gap are usually caused by RH problems. An ideal situation would be a stable indoor relative humidity between 30 and 50% all year long.
Determining relative humidity: Several methods are available for determining relative humidity. The easiest method is to purchase a digital hygrometer from some place like Radio Shack. These devices cost less than $30, and often provide temperature as well as RH readouts. Those these devices are not the most accurate, they can show trends and indications of potential problems. They can be calibrated for more accurate readings. To calibrate, fill a soup bowl 2/3's full with tap water. Add table salt until no more salt dissolves, and some salt crystals remain in the bottom of the bowl. Place the bowl of salt water and the hygrometer in a plastic bag, seal it shut, and read the RH after about 6 hours. The reading should be 75% RH. If not, add or subtract the difference as a calibration factor. For example, if your hygrometer reads 70%, you should add 5% to all readings. If the reading was 85%, you should subtract 10% from all readings.
A second method for determining relative humidity is by using a simple thermometer, glass of ice water and a psychometric chart.
Step 1. Measure the temperature of the air with the thermometer. Step 2. Fill a drinking glass 2/3's full with tap water. Add a few ice cubes and stir with the thermometer. Step 3. Watch the outside of the glass as you stir. As soon as you see condensation (a haze) form on the outside of the glass, read the thermometer. Step 4. Enter the two temperatures in the calculator or use them on a psych chart.
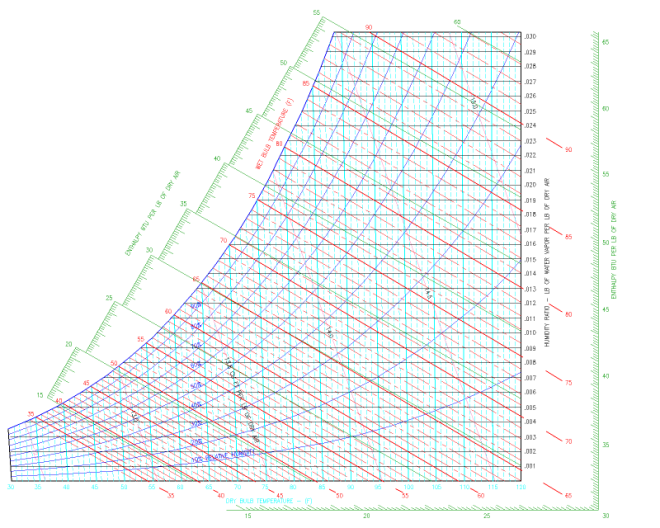
18. NATURAL WOOD STRAND
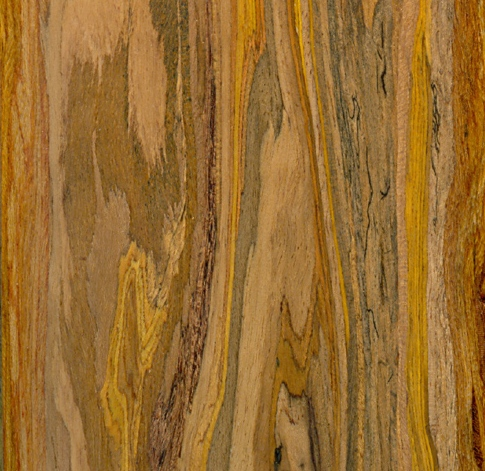
Sustainability Benefit:
Made from post-industrial, by-product poplar material sourced from the furniture manufacturing and pulp industries, the TIMBER™ line (“FSC-Recycled”) epitomizes sustainable product innovation, and highlights the idea of taking industrial discards, and making them better than their traditional counterparts. The sourced wood strands are sorted by color, rendered inert through cleaning, coated with a low-VOC and EO resin, and then are compressed into the desired formulation. The TIMBER Natural color is a specific “recipe” which is predicated by both the aesthetics it creates and the raw material supply being sourced. The color composition is strictly controlled, and designed to be consistent throughout the ebbs and flows of strand supply. When clear-coated, as is the TIMBER Natural when supplied prefinished, the color and pattern extend throughout the entire thickness of the material (either throughout the full thickness of the “solid”, or through the entire thickness of the engineered wear layer), which facilitates simple screen-and-recoat maintenance over time, lowering the life-cycle costs compared to other material which has a stain applied to achieve the desired look.
19. WOOD ENGRAVING

Wood Engraving Machines
Epilog Laser's co2 laser systems are growing in popularity in the woodworking industry as an increasing number of woodworkers are seeing the variety of products that can quickly and easily customize with an Epilog Laser system.
|
Wood engraving is one of the most popular applications for the laser because it can encompass so many different products. From cabinetry to photo frames to knife handles, Epilog's laser systems are used in almost every woodworking category you will run across.
|
20. COUNTERSINK SCREWS
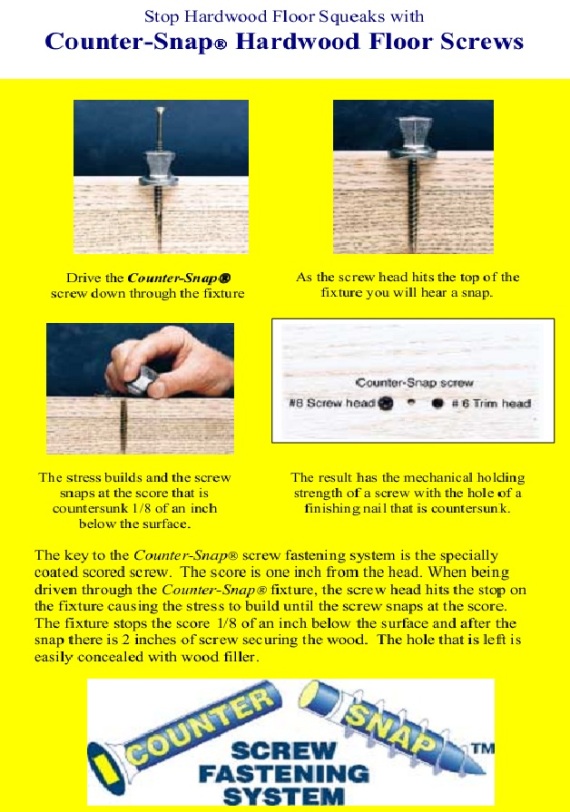
21. WIDTH MEASUREMENTS OF SOLID PREFINISHED
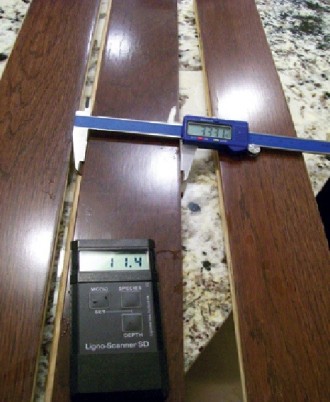
SOLID PREFINISHED WOOD FLOOR WIDTHS WILL NOT BE PERFECT
Width variation in solid prefinished plank are frequently seen with gaps between the long edges of the rows. With two boards placed end to end there can sometimes be a visible difference in width that may appear to be mismilled.
Wood varies in dimensions with moisture. It must be acclimated to the local job site and verified that the subfloor and wood flooring are within the industry standards (the strip is within 4% and plank within 2% of the subfloor moisture level).
NWFA standard:
• for flooring with an actual width less than or equal to 3 1⁄4”, the standard is + or - 0.005”.
• for flooring greater than 3 1⁄4”, the standard is + or - 0.008”.
The maximum width variation allowed, then, is 0.010” (ten-thousandths or one-hundreth inch) for strip and 0.016” (sixteen-thousandths or one sixty-fourth inch) for planks?
An opened box of uninstalled solid plank (3 1⁄4” or wider) will vary in widths by 0.020” to 0.0030” or more (this applies to any brand, any species, any moisture content, any time)!
Board milled within a few thousandths of an inch by the manufacturer can have variations much larger even before installation.
Width-Variation Complaints
- Measure the worst uninstalled boards, not the gaps in the floors.
- Many factors can cause gaps: width variations (yes), but also uneven starting lines (especially walls), bowed boards, and uneven nailing.
- Mechanic’s feeler gauges do well.
- Measure wood with measuring moisture, for the wood changes exactly with the moisture change.
This exact number is called the dimensional change coefficient; labeled CR for radial (quartersawn) and CT for tangential (flatsawn). It measures how much 1” of wood will change for 1% change in moisture content (between 6% and 14%). It is listed in the Forest Products Laboratory Wood Handbook Table 12-16 for 100 species or more.
PDFs of the Handbook chapters are available for free online.
New NWFA Standard allows a manufacturing MC range of 6-10%.
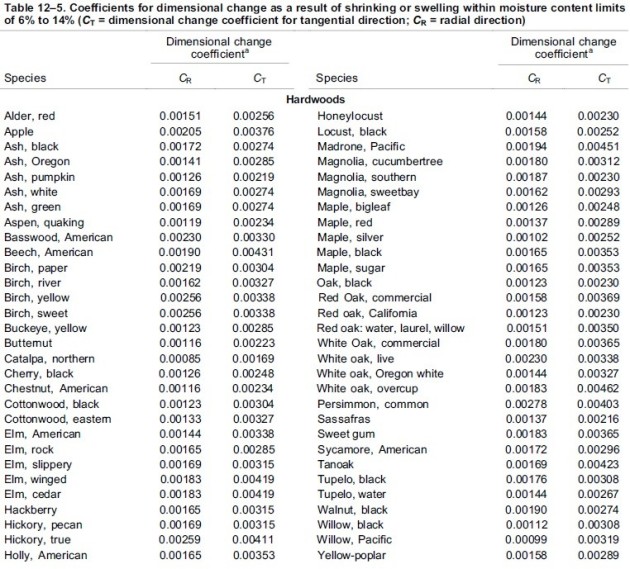
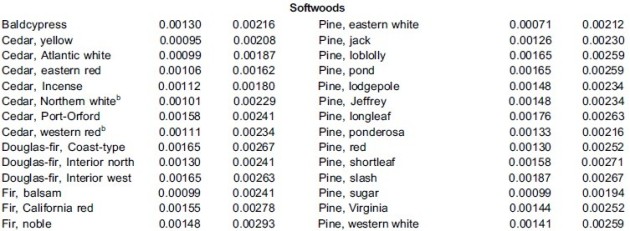
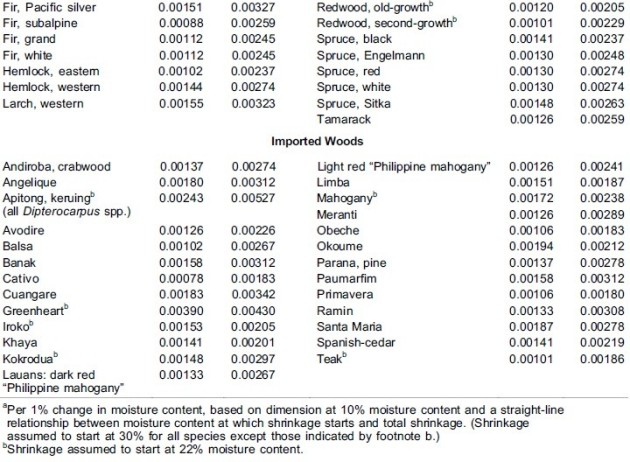
*(Ranked by dimensional change coefficient) The numbers in this chart reflect the dimensional change coefficient for the various species, measured as tangential shrinkage or swelling within normal moisture content limits of 6-14 percent. Tangential change values will normally reflect changes in plainsawn wood. Quartersawn wood will usually be more dimensionally stable than plainsawn. The dimensional change coefficient can be used to calculate expected shrinkage or swelling. Simply multiply the change in moisture content by the change coefficient, then multiply by the width of the board. (Keep in mind that engineered wood is much more dimensionally stable than solid wood and changes will be less than those given by the above formula.)
*Source: "National Wood Flooring Association Technical Publication No. A200", p.7: orig. from "Wood Handbook: Wood as an Engineering Material", Agriculture Handbook 72, Forest Products Laboratory, Forest Service, US Dept of Agriculture, revised 1987.
To think about dimensional change, take two quartersawn red oak boards—one at 6% MC, one at 10%. Mill them into identical 3 1⁄4” boards. If the 10% board equalizes to 6%, it shrinks by 4 x 3.25” x .00158 (% moisture change x width x CR), or 0.021”.
Take two flatsawn red oak boards—one at 6% MC, one at 10%. Mill them into identical 3 1⁄4” boards. If the 10% board equalizes to 6% it shrinks by 4 x 3.25 x .00369 (% change x width x CT), or .048” (between 1⁄32” and 1⁄16”).
This width variation will stay the same if both boards go to 4%, 8%, 10%, 12% or any MC; it is the moisture difference at time of manufacture that creates the width variations.
Some boards will vary in moisture from end to end; a board milled at 6% MC at one end and 10% at the other will vary in width from end to end.
Some boards will vary in grain from end to end; a board that is radial at one end and tangential at the other can vary in width if the moisture changes.
How can a manufacturer minimize width variation complaints?
Control moisture to a narrower range than the maximum 6-10%. A 4% range in red oak will allow almost a 1.5% maximum width variation (4 x .00369); the old NOFMA/NWFA published range of 6-9% allows about a 1% variation. Narrowing the moisture range to 2% means boards vary +/- by one third of one percent or less; but still +/- 0.008” on a 2 1⁄4” strip, 0.018” on a 5” plank!
Use radial grain (quartersawn) lumber; it varies by less than half the number of tangential (0.00158/0.00369).
Use more stable species. Beech (CT 0.00431) varies more than red oak (0.00369); cherry (0.00248) varies less.
Use eased/beveled edges to minimize visibility of gaps/width variations.
“Prefinished flooring will vary in width by up to 1⁄16” or 1% coming out of the box; this is not a defect!” Wide planks will show larger gaps.
The retailer/installer cannot fix these width variations?
Prefinished plank cannot be installed perfectly tight. Unfinished flooring has the same variations and gaps, but they are usually filled during finishing.
Starting installations should use the centerline starting method described in the NWFA Installation Guidelines.
With wide planks, use tools that tighten the boards together, and putty/filler is your friend. Don’t try to sort planks for width unless you’re compulsive and paid for it!
Peter Fahey is flooring division manager at Clem Lumber & Distributing in Alliance, Ohio, and is an NWFACP Certified Inspector.
22. DEAD SPOTS
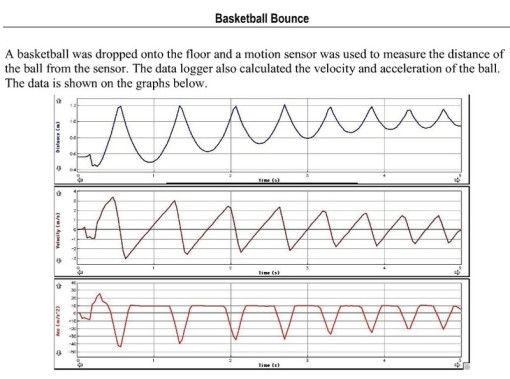
Dead Spots
In layman's terms, "dead spots" are locations on a sports floor where ball rebound is markedly less than on the majority of the rest of the surface. Many maple flooring systems exhibit vibrations and sound variations when a basketball is bounced at different locations. Often, areas where vibrations and sound variations are observed are mistakenly termed "dead spots." Provided the ball rebounds to a reasonably consistent height in comparison to other locations on the floor, areas where vibrations and sound variations are present do not typically qualify as true "dead spots."
Concerns about "dead spots" are most often expressed with floating subfloor configurations. Floating floors often exhibit sound and vibration variations due to the structure of the subfloor components. Ball rebound can be affected on all subfloor configurations due to seasonal changes in flooring moisture contents and resulting system expansion/contraction. It is not uncommon for a true "dead spot" to move or disappear as a flooring system adjusts to varying seasonal moisture conditions -- regardless of the subfloor system installed in the facility.
How do you confirm the presence of a true "dead spot" on your floor? For many years, MFMA and the entire sports flooring industry recognized the Wilson Sporting Goods ball bounce test as the standard for determining the presence of "dead spots" on a floor. With recent developments in performance engineering on flooring systems, the Wilson test method has been replaced as the recognized standard for ball rebound.
MFMA now recognizes the international D.I.N. #18032 Part 2 standards for a number of sports flooring performance issues. In most simple terms, the D.I.N. standards use a concrete floor as a base measurement for rebound performance, and compare rebound on all engineered surfaces as a percentage relative to results on concrete. Specialized equipment is used to time impact intervals of a ball dropped at multiple locations across an athletic surface, and calculations based on these impact figures result in a composite score for the floor. Variations from the composite figure are examined to determine the presence of any true "dead spots."
Most MFMA milling company members can provide laboratory-generated composite ball rebound figures for their flooring systems, and are available upon request for a fee to field test floors where "dead spots" are a concern.
If you have any additional questions, please contact MFMA's Technical Director at 847/480-9138.
Rev. 10/97
23. MINERAL STAINS
Virginia Tech Studies the Relationship of Mineral Stain in Red Oak to Growth Site Characteristics
The potential presence of mineral stain can make it difficult to accurately assess the value of any particular stand of red oak trees.
By Peter Hamner, Brian Bond, Lynn Resler
Date Posted:
4/1/2010
The “Red Oak”
classification for lumber and veneer is comprised of seventeen tree species; these species currently account for the majority of timber resources that are available in the Appalachian Mountain region
of the United States. Since red oak accounts for such a high percentage of the available forest resource, its cost as a raw material and its value in sawn products greatly impact the profitability of
the hardwood manufacturing industry in the Appalachian region.
For
hardwoods, value is typically dependent on appearance, particularly with regard to large clear faces of light colored wood in both lumber and veneer. Therefore, any visual blemishes or discolorations
in the wood, such as knots, stains, streaks, spots, and holes, are considered defects that affect value negatively. While some of these defects can be observed and assessed when evaluating a
living tree, others such as mineral stain cannot be detected. The potential presence of mineral stain can make it difficult to accurately assess the value of any particular stand of red oak
trees.
What is Mineral Stain?
Mineral
streak or stain is an area of dark discoloration that occurs within the stem of a living tree. This visual defect commonly occurs in red oaks and other hardwoods. When present, it usually can be seen
bordering potions of one or more growth rings, or in small patchy clusters within the sapwood, heartwood, or both (Figure 1). Sawn lumber or slices of veneer containing mineral stain will have dark
greenish to black colored streaks appearing on their surfaces (Figure 2). Since higher value lumber and veneer products are directly associated with visually clear faces, the presence of mineral
stain can significantly devalue an otherwise potentially high grade, high value product like veneer.
Mineral stain is not only a visual defect in lumber; it can also lead to processing problems.
Both the primary and secondary wood industries have long recognized that lumber containing mineral streaks is more prone to surface checking and internal honeycomb when it is dried – a fact that has
been documented by research. Mineral streaks are also noted to be harder than normal wood due to the ash content being considerably greater than normal wood. This increased hardness in mineral
stained areas can be difficult to cut or shape and can damage the edges of cutting tools.
The formation of mineral stain in living trees is not well understood, and few explanations exist to account for its development and presence in oaks or other
hardwoods. Though some researchers have attributed its onset as a result of abnormal cell physiology occurring from wounds or infections caused by insects, bacteria, fungus, animals, weather, or
human activity (logging), there is more evidence to suggest that the occurrence of mineral stain is related to site-specific variables. For example, it has been reported that mineral-free, light
colored red oak is more commonly found in certain areas of the country including lower New York, Pennsylvania, southern
Indiana, and southern Michigan. These reports suggest that geographic variation in site characteristics may influence mineral staining.
Poor site quality and/or soil properties are also thought to be probable causes of mineral staining in red oak. Wet, poorly drained soils are often associated
with the formation of mineral stains in hardwoods. For example, it has been reported that oaks, sweet gum, ash, and cottonwood contain “much more” mineral stain than similar species growing on better
drained sites. It has also been noted that increased incidences of mineral staining in red oak may be related to trees growing on soils with a high content of coal, or trees growing on slopes. Yet,
perhaps the most common agreement among foresters and log buyers in the Appalachian region is that red oak trees harvested from areas that are somehow associated with previous or current cow pasture
use are the most likely to contain mineral stain.
Despite these general observations, it is clear that the causes of mineral stain associated with site quality remain
vague. Based on the results of previous research, no definite conclusions have been made to explain the presence of mineral stain in oak or other hardwoods. Mineral stain has been found in young
trees and in old trees, in trees on poor sites and in trees on good sites. It has been found in trees with apparent injuries that occurred during their development, and in trees with no apparent
injuries. As a result, it is generally agreed upon by both the academic community, and by those with years of experience in the field, that understanding how and where mineral stain occurs in oak and
other hardwoods is a complex problem.
Because the presence of mineral stain is currently impossible to predict in standing trees, a method to determine the likelihood of its presence in red oak
stands would greatly improve the ability of landowners, timber managers, foresters, and the primary and secondary hardwood industry to improve quality and value assessments of the
standing timber.
Study to Determine Geographic Factors
With the support of the hardwood industry in Virginia and West Virginia, and funding provided by the USDA Forest Service – Wood Education & Resource Center (WERC), a research team at Virginia Tech is carrying out a project aimed at fostering a better understanding of the relationships between red oak growth site characteristics and the presence and severity of mineral stain in red oak trees. To minimize variation, the focus of the study will be limited to Virginia and West Virginia only, although results will likely apply to other geographic regions.
Research methods that will be used to assess the frequency and severity of mineral stain
in this study will involve field data collected from forest harvesting sites that have been targeted to study specific red oak growing conditions. At these sites, data will be
collected based on the presence and severity of mineral stain as it can be
observed in the end of a cut log (cross-sectional face), and correlated with relevant growth site characteristics. Geospatial information will also be collected and
analyzed.
The goal of this research is to develop a model that will provide landowners, foresters,
and the wood industry with the ability to predict the presence and severity of mineral stain in stands of red oak trees. This will improve harvesting decisions and value assessment
of red oak trees for land owners, foresters, and industry personnel by filling in an important gap in the knowledge of the relationships between site variables and mineral staining
across the Appalachian mountains of Virginia and West Virginia. Models based on geographic location and selected growth site variables can be used by stakeholders to predict the presence/severity of
mineral stain, and thus assign the appropriate value to the raw material and make better harvesting decisions. Part of the goal is to disseminate the results of this work to all stakeholder groups.
Being able to predict the presence and severity of mineral stain based on geographic region and growth site variables would allow all interested parties to make better price and harvesting decisions,
and ultimately improve the profitability and competitiveness of the hardwood industry.
Does the Log End Indicate the Amount of Mineral Stain in a
Log?
The first portion of this project included a pilot study to validate whether the amount of mineral stain observed in the end of a log
is representative of mineral staining throughout the entire log. The study utilized imaging analysis techniques to measure percentages of mineral stain observed of the surfaces of log ends as well as
the lumber that was cut from the logs. The amount of mineral stain occurring in the cross-sectional face of the study logs ranged from about 0.5% to close to 8%. The results of the pilot study show
that a linear relationship exists between the amounts of mineral stain observed in the end of a particular log and the surfaces of the lumber cut from it. Furthermore, a high degree of correlation
was shown to exist (correlation factor =0.96). In other words, the amount of mineral stain present on the cross-sectional face of a log is a good indication of how much mineral stain will be present
in the surfaces of lumber or veneer cut from that log.
The project is continuing through the spring of 2010 and we hope to share the final results this summer. If you have any insights about mineral stain in
relation to growth site, please don’t hesitate to contact us.
For more information please contact Peter Hamner at 540/231-3043 or email: phamner@vt.edu.
24. EMERALD BORER
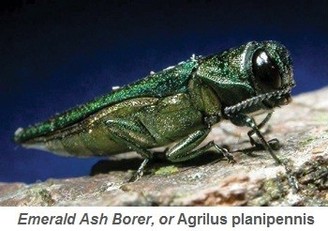
Forest Service Combats Emerald Ash Borer With Wasps
The U.S. Forest Service has released stingless wasps along the eastern edge of Michigan's
Huron-Manistee National Forests, on the state's lower peninsula,
to help counteract the invasive emerald ash borer.
The release marked the first time biological measures were taken to fight the beetle inside a national forest. In July, the Forest Service received approval to release two species of
parasitoid wasps, Oobius agrili and Tetrastichus
planipennisi, in the national forest and on nearby private lands in Michigan's Alcona County. Environmental analyses showed that the wasps do not harm people, non-target species, or the
environment.
“The emerald ash borer has caused so much damage to forests and so much loss to communities in Michigan’s Lower Peninsula,” said Michael T. Rains, director of the U.S. Forest Service's
Northern Research Station. “Expanding the use of biological control to national forests and research on its effectiveness will contribute to more resilient forests in the
future.”
The tiny beetle first made its way to the U.S. in the early '90s, "presumably from solid wood packing materials or dunnage used to transport manufactured goods," according to the U.S. Forest
Service. It has since spread to at
least 13 states.
The Forest Service doubts the wasps can save larger ash trees, but they could reduce the beetle population enough to "curb their effect in the future."
The two wasps have different ways of preying on the beetles. Oobius finds a beetle egg and injects its own egg inside, where it will hatch, grow, and kill the host egg. Tetrastichus females
lay eggs inside beetle larvae, where the
wasp larvae feed and grow, eventually killing their host.
More on the emerald as borer can be read here.
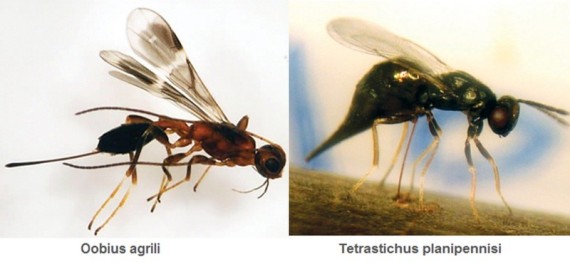
25. ADHESIVES - NEED TO KNOW
What You Should Know About Wood Flooring Adhesives
Lauren Forshee
Wood flooring adhesives are available in many different formulations, and the array of choices can be confusing. Some might think all adhesives are more or less the same thing – when it comes down to
it, it’s just glue in a bucket, right? – and so they select the cheapest adhesive available for the job. However, that one-size-fits-all mentality can lead to costly failures.
First, you must know whether the products you have selected for the job are in fact designated for the wood flooring being installed. It may sound like a no-brainer, but it can be easily
overlooked.
According to David Clarkson, DriTac’s vp marketing, the right adhesives are specifically formulated to offer a range of benefits to contractors and installers. “The adhesive technologies can provide
the installation professional with not only the right adhesive for each type of installation, but can also provide a choice of products that meet their specific requirements for ease of use, cleaning
up, quality, cost and so on,” he said.
One thing to keep in mind before choosing the adhesive is whether it is environmentally friendly. Choosing one adhesive over another (and the price tag associated with it) may come down to whether
higher green content means anything to your client. For many people this is a very important consideration. They want the peace of mind of knowing that what they are putting into their home, store or
company is not potentially harmful to them or the environment. No one wants to receive a callback because the client is unhappy with an adhesive, whether on the grounds of performance or
environmental sustainability.
Jeff Johnson, MAPEI’s business marketing manager for Floor Covering Installation Systems, suggests selecting a company with a solid track record to reduce the number of potential callbacks and to
make sure there is a support system in place if calls do come in. “Selecting an adhesive with the right performance attributes and performance history can help ensure the project is installed right
the first time,” he noted.
New adhesive products
We asked several manufacturers to share information on their latest wood flooring adhesive products and technologies. Advanced Adhesive Technologies’ AAT-535C Professional Wood Flooring Adhesive
contains no chlorinated solvents, no isocyanates and is ozone safe. The adhesive is recommended for bamboo, solid wood and all types of engineered wood flooring over commonly encountered
subfloors.
Gregory P. Wood, president of AAT, noted, “The contractor should be ultimately familiar with the recommended dwell, drying and curing times for the adhesive when installing wood flooring. Only use
the specific trowel recommended by the adhesive manufacturer.”
DriTac recently introduced several new products to the market that are environmentally friendly, including an MS Polymer product for sound and moisture control called DriTac 7700 Easy Clean 4-In-1.
“It was created with the installer in mind and offers one-step installations, saving time and money,” Clarkson noted. Additionally, the new DriTac 9500 Ultra – Acrylic Urethane is designed to offer
rebondability and be easy to spread as well as clean up.
Franklin International’s Titebond 991 PROvantage Wood Flooring Adhesive is a new solvent-based wood flooring adhesive that allows contractors to easily spread the adhesive and proceed with an
installation quickly, according to the company. It also offers resistance to moisture and can help reduce the risk of subsequent moisture or water damage to the wood flooring.
TEC Multi-Powered Wood Flooring Adhesive, from H.B. Fuller Construction Products, is a one-step moisture control with a strong initial grab that also features sound deadening and crack bridging
capabilities. “Our new wood flooring adhesive is a great example of a product innovation that was driven by listening to installers’ needs for high performance and ease of use,” said Grant Huffine,
senior market manager for H.B. Fuller Construction Products.
MAPEI’s Ultrabond ECO 995 utilizes green technology and naturally renewable resources to offer an odor-free and phthalatefree installation that can also contributes additional points toward
LEED-certified projects. Ultrabond ECO 995 is a multifunction adhesive, and Johnson believes it is a good choice for wood flooring because “protecting wood flooring from moisture coming from the
subfloor is almost a necessity and having this characteristic built into the adhesive saves time and labor costs.”
Manufacturers note that when installing a wood floor, the best advice is to read the instructions carefully and more than once. The instructions will tell you all you need to know, but making sure
you have the right product for the right job is key. Never assume all adhesives are the same. Keep pace with the newest technologies, and you will already have a leg up on your competition.
26. SUBFLOOR REQUIREMENTS
Subfloor Requirements For Hardwood Floors
Brett Miller
Everyone in the construction industry is familiar with the old adage “Measure twice and cut once.” This common-sense approach reminds us to avoid mistakes and do the job right the first time. This
mentality should extend to every part of the project, and that includes below the floor.
One of the most critical steps in successful wood flooring installations is the subfloor. The type and condition of the subfloor will impact the installation process and determine the success or
failure of the flooring long-term. Wood floors can be installed over either wood or concrete subfloors, and the requirements for each are different.
According to the National Wood Flooring Association’s Installation Guidelines, wood subfloor panels should conform to US Voluntary Product Standard PS1-07, Construction and Industrial Plywood; and/or
US Voluntary Product Standard PS2-04; and/or Canadian performance standard CAN/ CSA 0325.0-92 Construction Sheathing.
Solid-board subfloors
Solid-board subflooring should be 3/4” x 5 1/2” (1” x 6” nominal) Group 1 dense softwoods, No. 2 Common and kiln-dried to less than 15% moisture content. It should consist of boards no wider than 6”,
installed on a 45-degree angle, with all board ends full-bearing on the joists and fastened with minimum 8d rosin-coated or ring-shanked nails, or an equivalent.
Some types of wood flooring should not be installed directly over solidboard subflooring. Thin-classification solid-strip flooring must have a 3/8”or better plywood underlayment installed over solid
board subflooring. Parquet flooring cannot be installed directly to solid-board subfloors and requires 3/8” or better underlayment panels, nailed on a 6” minimum grid pattern using ringshanked nails
or staples.
About the Author
Brett Miller is the Director of Certification & Education at the National Wood Flooring Association where he is responsible for the development, coordination, implementation and presentation of
the NWFA’s technical training schools, workshops, and on-line training, as well as the NWFA’s certification program. Miller has more than 21 years of experience in the hardwood flooring industry,
most recently having worked as regional manager at Basic Coatings.
27. ASTHMA

REPORT: EVEN APPROVED FINISHES, FLOORING COULD CAUSE ASTHMA
|
The Healthy Building Network
released a new report on the links between building products and asthma, titled “Full Disclosure Required: A Strategy to Prevent Asthma Through Building Product Selection.” It notes that Indoor Air
Quality (IAQ) testing standards currently do not cover more than 70 percent of the asthmagens—agents which cause the onset of asthma in someone who did not previously have the condition—HBN
identified in building materials. |
28. SILICA STREAKS
ROBINSON, LUMBER COMPANY, Inc.
FLOORING DIVISION
February 8, 2003
By Joe Buckhaults
SILICA STREAKS IN BRAZILIAN CHERRY (JATOBA) FLOORING
Almost all producers, merchants, and installers of Brazilian Cherry flooring are aware that on very rare occasions Brazilian Cherry can contain silica streaks which stand out when the floor is finished. While we remove almost all of the pieces containing this silica during our many inspection processes, an occasional piece can get through our system. It is important that the installer be alerted to look for this silica as he is the last inspector before installation.
This silica appears as small white to yellow colored streaks usually about 1 mm X 5 to 20 mm in the unfinished state. When present the silica deposits are generally observed throughout the entire piece. They are very obvious once the floor is finished and tend to spread in width appearing as light spots usually about 5 mm X 5 to 20 mm.
Over the years our Brazilian subsidiary has tried to trace the origins of the silica, including to the logs and even standing timber. However, the occurrence is very rare (estimated at less than 1 percent of all Brazilian Cherry we have processed) and difficult to detect until a piece of Brazilian Cherry is finished. We, and to our knowledge, all others in the industry have not clarified the origin of the silica streaks. In our seven plus years of selling Brazilian Cherry flooring, we have had to reimburse customers for less than 400 SF of flooring with the silica streaks.
Once the Brazilian Cherry floor is finished, if it becomes apparent that any pieces have this silica defect credit to replace the affected square footage is subject to mill policy.
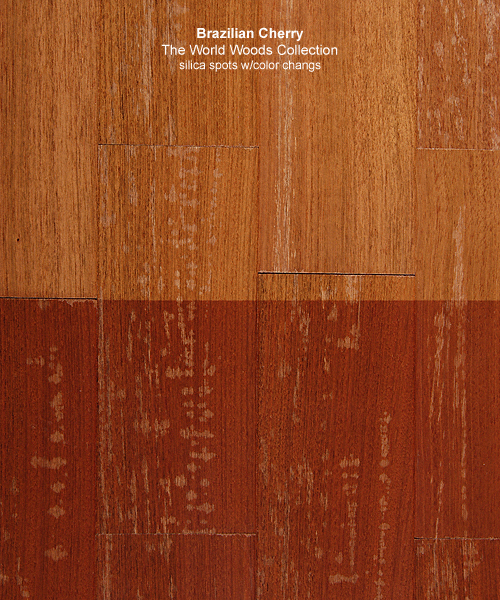
NOTE: ANY PART OF THE GENERAL INFORMATION FOUND ABOVE CANNOT BE DEEMED OF ANY SOLE CAUSE OF A FLOORING FAILURE WITHOUT PROPER TESTING DURING OR AFTER A QUALIFIED INSPECTION.
29. KILN DRYING DOESN'T FIX CONTENT
Why Kiln Drying Doesn’t “Fix” Wood Moisture Content

Written by Wagner Meters, published first by Floor Trends (November 2014 issue)
When looking at any type of unfinished wood at a lumberyard or flooring supplier, the majority of wood on the market has been kiln-dried to bring the wood’s moisture content into a workable range to prevent problems during the life of the final product. Kiln drying is a controlled process that speeds the natural transition of moisture from “green” lumber to a wood product that will be free from warping, buckling, splitting and a host of other moisture-related defects.
However, it’s important to understand that kiln drying does not guarantee that moisture-related problems will never affect a particular piece of wood flooring. Kiln drying is only one step in the journey of any wood from its growing green life as a tree to its final finished wood product.
What Does Kiln Drying Wood Really Do?
A living tree is a series of interconnected cells and pathways that conduct water from the ground up through its trunk and branches to the tips of its leaves. When the tree is fresh cut, this moisture within the structure of the tree remains.
It will eventually leave the tree through evaporation, but this process (referred to as air drying, because it involves moisture content being carried away by ambient air currents) is a slow one. If a tree air-dries too quickly the wood can split, warp or crack, damaging potentially useful wood.
Kiln drying uses a combination of heat and airflow to reduce the moisture content of green lumber in a shorter time frame than air drying would require. The target moisture content (MC) level will vary by wood species, but the ultimate goal is to have the wood reach a point that is roughly in balance with the relative humidity of the air around it.
Accordingly, each charge (or kiln load) is sorted by species and dimensions to optimize the process, to ensure that the final moisture content levels are even across the charge, and to bring the wood to a MC level compatible with a general guideline for wood moisture content.
In-line and in-kiln moisture measurement systems help to determine when the wood has reached optimal MC levels.
 Mills and manufacturers alike invest time, money and training into their drying processes to provide uniform results and optimal wood flooring products at the correct moisture levels
for their customers. The kiln drying process provides the best possible environment for removing excess moisture from wood in a timely fashion, delivering the highest possible quality material. The
goal is to remove the excess moisture while minimizing the damage to the wood that rapid changes might cause.
Mills and manufacturers alike invest time, money and training into their drying processes to provide uniform results and optimal wood flooring products at the correct moisture levels
for their customers. The kiln drying process provides the best possible environment for removing excess moisture from wood in a timely fashion, delivering the highest possible quality material. The
goal is to remove the excess moisture while minimizing the damage to the wood that rapid changes might cause.
So if the wood leaves the kiln at the required moisture content level, the moisture content process is complete, right?
Unfortunately, the answer is no.
What Kiln Drying Doesn’t Do
Wood is a hygroscopic material. It constantly interacts with moisture in its environment. The cells and pathways of the living tree will still absorb or release moisture as necessary to find a balance with its environment.
If the surrounding air is higher in moisture content (relative humidity), wood will absorb some of that moisture. If the air has lower moisture levels, the wood will release moisture. This process will continue back and forth until the wood has reached a point of balance with the surrounding air, a point called EMC, or equilibrium moisture content.
Why is that so important?
Wood may have the majority of its moisture removed during the kiln drying process, but it does not lose the ability to reabsorb moisture from its environment. Whether from a direct water source, moisture in an adjacent material or even humidity in the air, by its very nature, wood will be ready to absorb any moisture it contacts. Kiln drying doesn’t “fix” the moisture content level of a wood product; it merely reduces the amount of moisture to a generally workable range.
Wood’s moisture content will always be a variable, not a constant.
Here’s why kiln drying is only a first step in the moisture content process: At any step of the process after the kiln–transportation, manufacturing, storage or installation–it is possible for wood, even manufactured wood flooring, to lose additional moisture (in a dry environment) or re-absorb ambient moisture (in a humid environment) and have its moisture content level, and possibly even its dimensions, change again. This can present some very real challenges for you as the end user, particularly if you assume that kiln-drying alone is sufficient to protect from moisture-related problems.
Moisture Measurement in Wood Flooring
Wood flooring installers know wood’s moisture content varies depending on its environment. It’s just as important to allow each board bundle to acclimate to the job site environment before installation begins as it is for the manufacturer to make sure the moisture content is accurately monitored before it leaves the plant. Any flooring must be allowed time to adjust to the job site before beginning assembly, sanding or staining.
Whatever your application, the wood you use must be given time to adjust to the environment in which it will be worked or installed.
How to Accurately Monitor Wood’s Moisture Content
 A simple and easy-to-use wood moisture meter can provide quick, accurate and reliable monitoring of wood flooring to ensure that the installed floor will not suffer from
moisture-related problems. Pinless wood moisture meters, like our non-damaging line of wood moisture meters, can be used as often as necessary without marking the floor boards or causing imperfections that will
become visible once the finish is applied.
A simple and easy-to-use wood moisture meter can provide quick, accurate and reliable monitoring of wood flooring to ensure that the installed floor will not suffer from
moisture-related problems. Pinless wood moisture meters, like our non-damaging line of wood moisture meters, can be used as often as necessary without marking the floor boards or causing imperfections that will
become visible once the finish is applied.
At Wagner Meters, we know an accurate wood moisture meter can keep you informed during each step of your process and ensure your success every step of the way. Our wood moisture meters are designed to help wood flooring installers be sure their wood is ready for the project at hand.
From the first stages at the kiln to the first steps of each wood flooring project, the first order of business is to measure and be sure that the wood has acclimated to the right MC levels before beginning the job. Kiln drying is only the first link in the chain of moisture content management that is necessary for durable and beautiful finished wood projects.
TED HAS SOME TRICK PROJECTS WITH WOOD THAT YOU MAY WANY TO SEE
HOW ABOUT A SHED?
HOWS BOUT A GRAPE?